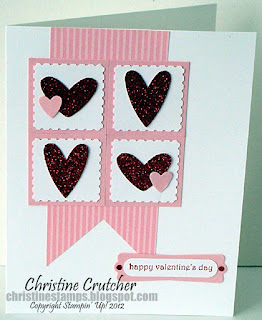
I need to work on taking better photos of my projects in the new year since this card is a lot prettier in person with the Red Glimmer hearts. I believe it was a little dark the other day when I shot my pictures. Here is my card:
I also finally decided to make myself a new watermark for my projects - so proud of myself! LOL.
Anyway there are a lot of punches on this card and if you were going to mass produce you can do this while watching TV. I know I hate all those annoying commercials so I will be punching out lots of hearts this week for some upcoming projects. I also saw an awesome idea from another demo where she organized all her little punched pieces in a mini muffin tin. So clever!
Each little square is separate and I just glued them down right next to each other to make an illusion of a much larger square. I cut the banner edge with my 1 3/4" square punch by just putting the Designer Series Paper into the punch forming a triangle and punching. It is hard to see, but the faux brads on my sentiment are red glimmer circles punched out from the smallest circle in the Owl punch. You could also use our Rhinestones and color them with a red sharpie for a similar look.
Come back and visit me later this week as I will be showing a few more related Valentine projects!
Happy Stampin',
Christine
Supplies:
Stamps: Teeny Tiny Wishes
Ink: Real Red
Paper: Whisper White & Pretty in Pink cardstock, Red Glimmer Paper, Designer Series Paper Patterns Stack in Subtles
Other: Postage Stamp punch, 1 3/4" Square punch, Heart to Heart punch, Word window punch, Modern label punch, Owl punch, Glue dots


Such a cute card! I love the glimmer hearts!!!
ReplyDeleteOMG Chrissy! First... LOVE the watermark.. second, I love the card!! Is this the one you're using for your class? If you need someone to come sit, give me a call.. i'd love to make this one.
ReplyDeleteGreat interpretation of this sketch. Love the sparkly hearts!
ReplyDeleteLove those sparkly hearts!
ReplyDelete