 |
| Stampin Up - Cookie Cutter Christmas |
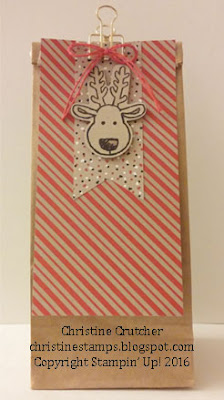
Tonight after work I pulled out a petite gift bag and whipped up this adorable gift bag. I have made a few others like this before, but I don't think I shared the instructions so you will find those below. The petite gift bags are the perfect size to hold some cookies or fudge (they are food safe), candy, or a small gift.
Want to make this project?
1. Cut a piece of Designer Series Paper 3" x 6"
2. Cut a coordinating piece of Designer Series Paper 1.5" x 4" and punch one end with the Triple Banner Punch then adhere in the top center of the larger DSP piece.
3. Stamp the reindeer from Cookie Cutter Christmas with Early Espresso ink on a scrap piece of Crumb Cake cardstock and punch out with the Cookie Cutter Builder Punch
4. If you want to add some dimension to your reindeer take a blender pen and color in his nose and the inside of his ears. I also colored in his antlers with my clear wink of stella pen.
5. Add reindeer to the banner with two Stampin' Dimensionals
6. Take 30" of baker's twine and double up then tie in a bow. Add bow to a glue dot then attach the glue dot to a gold binder clip.
7. Line up DSP piece to the top of the bag and clip to bag with the gold binder clip.
I'll be back to share another project tomorrow. Let me know if you have any questions.
Happy Stampin',
Christine
Supplies:
Stamps: Cookie Cutter Christmas
Ink: Early Espresso
Paper: Candy Cane Lane Designer Series Paper (sold out), Crumb Cake Cardstock
Other: Petite Cafe Gift Bag, Candy Cane Lane Baker's Twine, Banner Triple Punch, Gold Binder Clip, Blender Pen, Clear Wink of Stella Glitter Brush, Mini Glue Dots, Stampin' Dimensionals, Multipurpose Liquid Glue

No comments:
Post a Comment