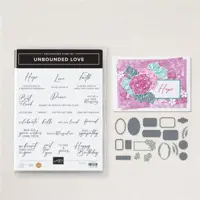
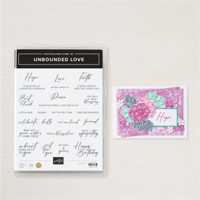
Sunday, March 31, 2013

Happy Easter!


Here is a simple treat made using the Two Tags Die for the Big Shot. You could easily change it up for any occasion and they go together pretty quickly.

Start with a piece of cardstock 8.5 x 2.5 then score in half at 4.25 on your Simply Score board. Run through your Big Shot on the skinny Two Tags die that looks like a bookmark. Tip: Make sure you put the folded cardstock above the cut line on the die as you want to make a little folder to adhere your candy or treat inside. 

Then take your 3/4" circle punch to punch a handle at the top center - you will need this hole to tie your ribbon. Then stamp your image with a Versamark pad creating a custom background - that creates a nice watermark look - use can stamp as much or as little as you want. You could add DSP here if you prefer.

I used about 12" for my ribbon bow.

For the tag I used the coordinating colors from my stamped image. I decided to match the ribbon and tag base the same color Pretty in Pink. Then I just played around with the coordinating colors. I used my markers for the stamped image.

Inside my treat is an egg shaped York peppermint patty treat. Yum! I added some snail adhesive inside and stuck my treat in to hold it in place. I decided to use the egg stamp since my treat is egg shaped. How cute is that! I got 16 treats from one bag of Yorks which is four pieces of cardstock and a pretty economical favor.

Hope you have a wonderful Easter or Passover with your family and friends.

Happy Stampin',
Christine

Supplies:
Stamps: Spring Sampler
Ink: Wisteria Wonder, Pretty in Pink, Pool Party markers, Versamark pad
Paper: Wisteria Wonder, Pretty in Pink, Pool Party, Whisper White cardstock
Other: Big Shot, Two Tags Die, 3/4 circle punch, 7/8 scallop circle punch, 1 1/4 circle punch, 1 3/8 circle punch, dimensionals, linen thread, Pretty in Pink 1/4" stitched grosgrain ribbon

Wednesday, March 20, 2013

Happy Spring!


Happy Spring to you! I hope it is beginning to feel like spring for you. Here in Massachusetts where are far, far away from any Spring weather. It took a long time for 'Ol Man Winter to pay us a visit this year and now he won't leave.

At the rate I am going I will be done with my Easter treats a week early. Woo-hoo! I will share my other Easter project later this week.

These flowers were popular last Spring and I remembered how simple and cute they were. First I stamped the Mixed Bunch flower with my Regal Rose marker on Whisper White cardstock. You can get 12 from one sheet of cardstock. Then I punched out a modern label punch in Wild Wasabi cardstock for each flower. I cut the modern label in half and adhered in a corner of the flower to depict leaves. Then I punched out flowers from the Blossom punch in Wisteria Wonder and layered onto my flower. You finish off the project with a rolo and a glue dot.

One bag of rolos made 36 flowers for me so it is a very economical treat for classmates, coworkers, friends, and family.

Stay tuned for another Easter project later this week.

Happy Stampin',
Christine

Supplies:
Stamps: Mixed Bunch
Ink: Regal Rose marker
Paper: Whisper White, Wisteria Wonder, Wild Wasabi cardstock
Other: Blossom punch, Modern label punch, dimensionals, glue dots

Sunday, March 17, 2013

Happy St. Patrick's Day!


I saw a Shamrock treat holder on Mary Fish's blog earlier this week that inspired me to make a few of these treat holders for some special ladies in my life. I kept the treat nice and simple since I whipped them up very quickly before I spent the afternoon yesterday making pasta with family. I don't normally make St. Patrick's Day treats or cards, but I wish I had more time to embellish these treats. I need to start earlier next time!

This is what the inside looks like:


You can fit a square chocolate or in my case I put three samples of organic beauty products for my family members to try or share with a friend.

The measurements for the DSP is 9 3/4 x 3 1/2 scored on each side at 3 1/4. You cut off a triangle on the right side piece to make the pocket. I adhered the bottom part of the pocket with Sticky Strip. 

I used scraps of the same DSP to make my shamrock on the front with three hearts from the Heart Embosslits for the Big Shot. Adding a rhinestone in the middle for some bling.

The white cardstock piece is cut out from the Labels Collection Framelits for the Big Shot. The ribbon I used is the 1/4" white taffeta and I used about 16" adhered with two glue dots to hold it in place.

I decided today to start on some Easter projects since Easter is only two weeks away. Hope you found some time this weekend for crafting.

Happy Stampin',
Christine

Supplies:
Stamps: None
Ink: None
Paper: Designer Series Paper Patterns Stack - Subtles Collection and Whisper White cardstock
Other: Big Shot, Fashionable Hearts Embosslits die, Labels Collection Framelits dies, Basic Rhinestones Jewel accents, Whisper White 1/4" stitched grosgrain ribbon, glue dots, dimensionals

Monday, February 25, 2013

Butterfly Thinking of You card


This is a quick and easy thinking of you card I mailed to a friend a few weeks ago. I have been super busy working on a fundraiser for my day job at a non-profit so I haven't had a lot of extra time the past few weeks to stamp much. I am happy to report that the fundraiser was very successful and now I can catch up on my stamp time!

I really love the color scheme on this card as I fell in love with Calypso Coral when it first came out. I think the baja breeze cardstock and ink softens the card up. What do you think? I look at this card in the middle of a very cold, snowy weather and it cheers me up. I hope it cheered up the recipient when she opened the envelope!

I also noticed how my stamping is kind of crooked on this card and I left it that way. A handmade card is a special treasure and this card shows that you do not need to be absolutely perfect when you are stamping. 

The butterflies are adhered with just a glue dot so you can turn the edges of the wings up just a little and pretend they are in flight. I added just a touch of bling with the rhinestones in the middle of the butterflies.

I'll be back to share another project real soon!

Happy Stampin',
Christine

Supplies:
Stamps: Curly Cute
Ink: Baja Breeze marker
Paper: Calypso Coral, Baja Breeze, Whisper White cardstock
Other: Calypso Coral 3/8" ruffled ribbon, Big Shot, Beautiful Wings embosslit, Rhinestone basic jewels, 1 3/8 circle punch

Tuesday, January 29, 2013

Butterfly Bridal Shower Favor


My friend Pam just inquired about bridal shower favors and this is the first sample I made up to show her. I absolutely love it! My only order was the color of the bridesmaid dresses are Wisteria. Well lo and behold Stampin' Up! has a beautiful purple color Wisteria Wonder and lucky for me I had some cardstock in my stash.

I used the petite purse die which makes a perfect favor size for some small pieces of candy or a small gift. I decided to chop the flap off the purse so you could peek inside. I added a mini tulle bag I had on hand for a visual so she could get an idea of what it might look like complete. In the bag is a sample of NYR Organic's Wild Rose beauty balm. If you have any interest in learning more about NYR (Neal's Yard Remedies) Organic skincare products please visit my website.

I embossed the cardstock before I put all together.

I hope Pam loves it too! What do you think? In hindsight, I should have puts hearts instead of the butterfly.

Happy Stampin',
Christine

Supplies:
Stamps: None
Ink: None
Paper: Wisteria Wonder cardstock & Silver Glimmer paper
Other: Big Shot, Petite purse die, Beautiful Wings embosslit, Vintage wallpaper embossing folder, 1 1/4 circle punch, Basic Rhinestones jewel accents, Mini tulle bag ($1 store)

Saturday, January 26, 2013

Easy Valentine Pouch

This is a super easy petal cone pouch project that would be great for classroom valentine treats. I hope you started your valentine projects since February 14th is coming up quick. 2013 is already flying by or so it seems. Don't tell anyone, but the red pencil came from my Christmas stash of items since I didn't have any valentine candy to show in this picture. You could also add a lollipop or pixie stick along with the pencil if you wanted. Stampin' Up! makes 1" x 8" skinny bags and you can also add your items in those bags then tie the ribbon and tag to the bag.

I'm sure you could whip up a bunch of these in no time. I might have to make a bunch for my co-workers. I haven't quite decided what to do for them yet, but I will share what I come up with.

Hope you are having a crafty weekend. I just put together two pretty bridal shower favor samples that I will share next week.

Happy Stampin',
Christine

Supplies:
Stamps: Occasions Alphabet
Ink: Real Red marker
Paper: Whisper White cardstock, Red glimmer paper, Patterns Pack Subtles Collection
Other: Big Shot, Petal Cone die, Real Red 1/8" taffeta ribbon, Red pencil ($1 store)

Monday, January 21, 2013

Spring Color Challenge ~ Thinking of You Card

I saw a spring color challenge on my friend Selene's blog here and decided to play along. How fun is that! Unfortunately it is not fun news that I needed to make this card. A coworker of mine just lost her sister and I wanted to mail a nice card to her home. When is the last time YOU mailed a card to a family member or friend? If it hasn't been a while add it to your to-do list. I have another thinking of you card to go postal this week.

I like sending thinking of you cards since it can cover a vary of situations. Inside the card YOU can personalize the message to your liking.

The color combination was Regal Rose, Rose Red, So Saffron, and Always Artichoke. I have to admit these are not my favorite colors, but I am very happy with how the card turned out. What do YOU think? I also laughed out loud at the color combo since I just ordered flowers for the services from the company last week and guess what? One of the baskets I ordered was yellows, pinks and a touch of purple with greens. Very similar to Selene's combination.

I am going to challenge myself to be inspired by colors when I am out & about around town. I'm sure I can come up with some great ideas by just window shopping at some of my favorite places. Always having my cell phone with me I can even snap a quick picture so I remember what inspired me.

Happy Stampin',
Christine

Supplies:
Stamps: Nature Walk & Teeny Tiny Wishes
Ink: Regal Rose, Rose Red, So Saffron, & Always Artichoke markers
Paper: Whisper White, Rose Red, & So Saffron cardstock
Other: Linen thread, Always Artichoke seam binding

Monday, January 7, 2013

Little Girl Valentine Pouch/Envelope


So Valentine's Day is coming up quick next month so I thought I would get a jump start on a few Valentine projects. I remember seeing a pouch/envelope made from the Fancy Favor die so I knew I had to figure out how to make one. I have to say this came out super cute!

The size of the pouch/envelope is perfect to hold a love note, mini card, small candy treat, or gift card. If you have the Two Tags Die the larger tag would fit. I am going to try the gift card holder next time I make this and I will share here on my blog.

For the adorable little girl (reminds of Campbell soup kids) I stamped her in Black stazon and "watercolored" her with my Blender pen and markers. I just scribbled some color from each marker on a large clear block and picked it up with my Blender pen and colored. It brings me back to childhood when I used to love to color in all my coloring books. I also love the soft look.

I had to add just a little bit of bling so I added rhinestones to the heart she is holding and to the 'i' in valentine's on the tag. If you have dazzling details you could also paint some bling onto her dress, ruffles, and bows and it would be cute.

My tip: When I use the Fancy Favor die I just use a piece of 8.5 x 11 cardstock and you will end up a slightly smaller tab, but it works fine and you don't need to have 12 x 12 cardstock.

Happy Stampin',
Christine

Supplies:
Stamps: Greeting Card Kids & Teeny Tiny Wishes
Ink: Black stazon, Primrose Petals, Pool Party, Pink Pirouette & Daffodil Delight markers
Paper: Primrose Petals, Pool Party, Whisper White cardstock
Other: Big Shot, Fancy Favor die, Labels framelits collection, Linen thread, Modern label & Word window punches, Blender pen, Basic rhinestone jewels, Cropadile

Thursday, January 3, 2013

Baby Gift Part 2


This is Part 2 of the baby gift for my co-worker. I was making up some Christmas thank you notecards and then moved right into making up some baby ones as well. Same concept as the Christmas  notecards. I used the Top Note die and trimmed the Whisper White around the edge then adhered to the Daffodil Delight bases. I stamped the greeting in Melon Mambo. I used my markers to color in the trim of the onesie in Daffodil then the heart in Melon. On all the envelopes I stamped a bib down in the lower left corner and colored the trim and heart Melon and the bib Daffodil. The last step for these was to get out my Dazzling Details to add some bling. I colored in the heart in the onesie and bib with the details so they sparkle a little bit. Just make sure you let them dry thoroughly before handling.


I packaged up the gifts in a plain white gift bag with some tissue paper I had on hand. I added a cute stamped tag that matches the notecards. The idea for the tag came from some adorable Christmas tags that my friend Selene made up. You can see her tags here.

Happy Stampin',
Christine

Supplies:
Stamps: Curly Cute, Baby Bundle
Ink: Melon Mambo & Daffodil Delight markers, Black stazon
Paper: Daffodil Delight, Melon Mambo, & Whisper White cardstock
Other: Big Shot, Top Note die, Dazzling details, White baker's twine, Cropadile, Scallop circle, 1 1/4 circle and 1 3/8 circle punches

Wednesday, January 2, 2013

Baby Gift Part 1


This is Part 1 of a baby gift for a co-worker that is due any day now. I had a lot of fun putting this little gift together. I call this my Baby Washcloth Cupcake. In the past I have made sets of separate baby washcloth cupcakes, but I decided to switch things up a bit.

The cupcake consists of 4 organic baby washcloths that I purchased at a local baby store Buy Buy Baby. You can purchase baby washcloths at almost any store that sells baby items. In the middle is a talc-free organic baby powder. I chose NYR Organic's baby powder and you if have never heard of them you can check out my website for more information. NYR offers certified organic makeup products as well as award winning skincare products for the entire family.

I just tied some ribbon around the cupcake to hold it all together and made up a quick tag using my Two Tags die following the color scheme in the washcloths.

Stay tuned for Parts 2 & 3 of the gift later this week.

Happy Stampin',
Christine

Supplies:
Stamps: Baby Bundle
Ink: Black stazon, Pretty in Pink & Chocolate Chip markers
Paper: Whisper White, Pretty in Pink, & Chocolate Chip cardstock
Other: Big Shot, Two Tags die, Pretty in Pink taffeta ribbon, White baker's twine, Scallop circle, 1 3/8 circle, and 1 1/4 circle punches