Classes/Tutorials

Showing posts with label favor. Show all posts

Sunday, July 29, 2018

Steph’s Bridal Shower


Yesterday was my cousin’s fiancĂ©e Steph’s bridal shower. First it was held at an amazing tapas restaurant in Brookline, MA called Barcelona Wine Bar. If you are ever in that area check it out. I was hired by my aunt (mother of the groom) and cousin (sister of the groom) to make favors for the occasion. They liked a mini purse that could hold some candy. The bride’s favorite color is pink and navy is the wedding color.

That led me to dig out my retired Petal Purse die, but I mixed it up with some new items – the lovely Petal Pink cardstock & ribbon, Rose glimmer paper, and Dynamic Tufted embossing folder. I absolutely love how they turned out and so did everyone at the shower. The purses are pretty small they held three dark chocolate Lindt truffles. Here is a photo with them all assembled at the event (sorry it is not the greatest photo).


I also made Steph some thank you cards using the lovely Petal Promenade Designer Series Paper (on sale Buy 3, Get 1 Free until Tuesday) and again used the Petal Pink cardstock and ribbon. They came together quickly and now she’ll have a supply for when she needs them. A huge thank you to my friend James who saved the day on Friday when I ran out of ribbon and needed to purchase his supply.

Stampin Up Love What You Do

Measurements:
Thick Whisper White card base: 5 ½” x 8 ½”, score in half at 4 ¼”
Petal Pink Cardstock: 3 1/4" x 4 1/4"
Whisper White Cardstock: 3" x 4"
DSP: 2 3/4" x 2 3/4"
Ribbon: 4" piece

I hope your weekend is going well. It was fun to catch up with family yesterday and now today we are checking out the 32nd Lowell Folk Festival right down the street from our home. I’m excited to hear some amazing music, eat lots of yummy food, and see local area friends.

Let me know if you have any questions about today’s post.

I’ll be back on Tuesday with another project to share.

Happy Stampin’,
Christine

Product List

Tuesday, March 1, 2016

Baby Shower Favors


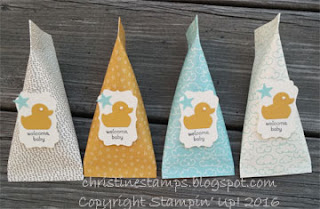
Today was the big day - a surprise baby shower for a co-worker on my team. I am sharing the baby shower favors I created over this past weekend for the event. I decided to go with quick and cute and make sour cream containers filled with Dove chocolates. 

Christine's Tip: Use a strong adhesive such as Tear & Tape when putting together sour cream containers for a strong bond. You can also crimp the edges if you have a crimper tool (retired from Stampin' Up!). For these favors I cut my Designer Series Paper to 6x6 and put adhesive on one side and one bottom then rolled the paper like a toilet paper roll. Close the edges in opposite directions and you have your sour cream container. Embellish as desired. Did you see the little pearls for eyes?

I will be showing a few more baby projects this week so come back and visit me.

I hope this post inspires you to make something crafty! If you have any questions let me know. You can find all the supplies to make this project in my Online Store.

Happy Stampin',
Christine

Stamps: Petite Pairs
Ink: Memento Tuxedo Black
Paper: Sweet Li'l Things Designer Series Paper, Very Vanilla, Pool Party, & Hello Honey cardstock, 
Other: Big Shot, Magnetic Platform, Baby's First Framelits Dies, Itty Bitty Punch Pack, Decorative Label punch, Pearl Basic jewels, Tear & Tape Adhesive, Stampin' Dimensionals, Multipurpose liquid glue

Monday, September 2, 2013

Kim's Baby Shower

Happy September! I hope you are enjoying the long holiday weekend. It has been very busy here with day trip activities and catching up with family and friends. Yesterday was my friend Kim's baby shower. Of course I couldn't pass up the opportunity to make something crafty for her and the guests. I totally fell in love with the Hello World Ensemble for Stampin' Up!'s My Digital Studio software. For $19.95 it gives you everything you need for a baby shower, but I only used a few pieces for yesterday. Also remember you don't need the My Digital Studio software to use the downloads you can open them up in software you already own on your computer.

For the banner I did not change a thing just printed out the template and cut, added some ribbon, glue dots, and staples. Easy peasy!


For the favors I printed out the template as is, but turned the project into a hybrid (using digital and traditional paper supplies) by adding Marina Mist cardstock, Polka Dot Parade Designer Series Paper cut with my Chalk Talk framelit (thank you Selene!), white taffeta ribbon, and some Marina Mist coloring with my marker on the little banner. The favor was inspired by Becky Roberts.


For the frame again I just printed out the template as is and cut it to size to fit in my 8 x 10 frame. I believe this frame came from Dollar Tree. I have purchased a bunch lately and I am starting to forget which is which.
Could not be easier! You can see me and my tripod in the glass of the frame. I guess next time I should take the picture a different way. LOL


For part of my gift to Kim I made her a dozen thank you notecards. I kept the design super simple sorry that the picture did not come out better. I used the Chalk Talk stamp set and stamped with Whisper White craft ink on Basic Black cardstock then cut out with the coordinating Chalk Talk framelit. I cut out the hearts with my Fashionable Hearts Embosslits die using scrap of the Designer Series Paper from the favors. I used three hearts in total putting a small one on the inside of the card in the bottom right corner and adding a large one to the back of the envelope. I also added one rhinestone on the heart on the card. If you don't already know the Whisper White notecards come with envelopes 20 to a pack for $5.95 and they are cut and scored for you. What a great deal!


Let me know if you have any questions on these projects. I hope I inspired you to make something crafty. More details on the products used can be found in my Online Store.

Happy Stampin',
Christine

Supplies:
Hello World Ensemble Digital Download # 133528
Glue dots # 103683 
Whisper White 3/8" taffeta ribbon # 109070
Polka Dot Parade Designer Series Paper # 126902
Marina Mist 8.5 x 11 cardstock # 119682
Dimensionals # 104430
Marina Mist marker # 119679
Chalk Talk Clear bundle # 132730
Fashionable Hearts Embosslit die # 125596
Whisper White Notecards & Envelopes # 131527
Basic Rhinestones Jewel accents # 119246
Whisper White Craft pad # 101731

Sunday, March 31, 2013

Happy Easter!


Here is a simple treat made using the Two Tags Die for the Big Shot. You could easily change it up for any occasion and they go together pretty quickly.

Start with a piece of cardstock 8.5 x 2.5 then score in half at 4.25 on your Simply Score board. Run through your Big Shot on the skinny Two Tags die that looks like a bookmark. Tip: Make sure you put the folded cardstock above the cut line on the die as you want to make a little folder to adhere your candy or treat inside. 

Then take your 3/4" circle punch to punch a handle at the top center - you will need this hole to tie your ribbon. Then stamp your image with a Versamark pad creating a custom background - that creates a nice watermark look - use can stamp as much or as little as you want. You could add DSP here if you prefer.

I used about 12" for my ribbon bow.

For the tag I used the coordinating colors from my stamped image. I decided to match the ribbon and tag base the same color Pretty in Pink. Then I just played around with the coordinating colors. I used my markers for the stamped image.

Inside my treat is an egg shaped York peppermint patty treat. Yum! I added some snail adhesive inside and stuck my treat in to hold it in place. I decided to use the egg stamp since my treat is egg shaped. How cute is that! I got 16 treats from one bag of Yorks which is four pieces of cardstock and a pretty economical favor.

Hope you have a wonderful Easter or Passover with your family and friends.

Happy Stampin',
Christine

Supplies:
Stamps: Spring Sampler
Ink: Wisteria Wonder, Pretty in Pink, Pool Party markers, Versamark pad
Paper: Wisteria Wonder, Pretty in Pink, Pool Party, Whisper White cardstock
Other: Big Shot, Two Tags Die, 3/4 circle punch, 7/8 scallop circle punch, 1 1/4 circle punch, 1 3/8 circle punch, dimensionals, linen thread, Pretty in Pink 1/4" stitched grosgrain ribbon

Tuesday, January 29, 2013

Butterfly Bridal Shower Favor


My friend Pam just inquired about bridal shower favors and this is the first sample I made up to show her. I absolutely love it! My only order was the color of the bridesmaid dresses are Wisteria. Well lo and behold Stampin' Up! has a beautiful purple color Wisteria Wonder and lucky for me I had some cardstock in my stash.

I used the petite purse die which makes a perfect favor size for some small pieces of candy or a small gift. I decided to chop the flap off the purse so you could peek inside. I added a mini tulle bag I had on hand for a visual so she could get an idea of what it might look like complete. In the bag is a sample of NYR Organic's Wild Rose beauty balm. If you have any interest in learning more about NYR (Neal's Yard Remedies) Organic skincare products please visit my website.

I embossed the cardstock before I put all together.

I hope Pam loves it too! What do you think? In hindsight, I should have puts hearts instead of the butterfly.

Happy Stampin',
Christine

Supplies:
Stamps: None
Ink: None
Paper: Wisteria Wonder cardstock & Silver Glimmer paper
Other: Big Shot, Petite purse die, Beautiful Wings embosslit, Vintage wallpaper embossing folder, 1 1/4 circle punch, Basic Rhinestones jewel accents, Mini tulle bag ($1 store)

Tuesday, January 1, 2013

Happy New Year Treat


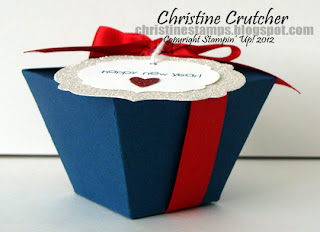
Happy 2013! I needed a little treat my for hubby so I put together this easy box using the Petal Cone die. Can you guess what kind of box from the picture above?


If you guessed a Chinese take out box ... You are correct! I remember seeing these out in blogland a while ago and just recently saw one and new it would be perfect for New Year's Eve. Inside I put 11 Hershey kisses one for each year I have been with my hubby.

If you need directions on how to make this you can find some videos on youtube. I followed the video from Dawn O or dostamping. I couldn't resist using Midnight Muse cardstock and ink and adding some bling with the glimmer papers. Everyone needs Midnight and bling on New Year's!

Happy Stampin',
Christine

Supplies:
Stamps: Teeny Tiny Wishes
Ink: Midnight Muse marker
Paper: Midnight Muse & Whisper White cardstock, Silver & Red glimmer papers
Other: Big Shot, Petal cone die, White baker's twine, Real Red 5/8" satin ribbon, Labels collection Framelits, Heart to Heart punch, Cropadile

Monday, December 19, 2011

12 Days of Christmas: Day 4


I am sorry I got off course with my Christmas ideas posts I will double up on them to get caught up this week. Between working some 10 and 12 hour days last week at my day job and two family Christmas celebrations this past weekend it was insane!

So this is a little stocking stuffer treat I made up for family. It is called a sour cream container and the only place I ever remember seeing sour cream containers like this was Wendy's when I was a kid. You could get a baked potato and add fixings from their salad bar. Anyway that is a trip down memory lane for today.

Inside my sour cream container are 5 Hershey kisses in my new addiction flavor - Dark Chocolate Mint Truffle. Yummy! It is all my friend Colleen's fault for introducing these to me at a craft fair a few weeks ago.

The instructions for this project came from our Stampin' Success magazine which is a monthly magazine you receive as a demonstrator with lots of ideas and inspiration. The sky is the limit on how you can decorate this little treat. I think it would be adorable as a favor for a bridal or baby shower.

I started with my cardstock cut to 5 1/4 x 4 1/4 then I embossed it which is optional then you roll it to form a cylinder (i.e. toilet paper holder) and adhere with sticky strip. Close one end with sticky strip fill about 2/3 full with treats then close the other end perpendicular to the bottom using sticky strip. If you leave your cardstock  plain you can crimp the edges with the crimper tool. Embellish as desired. I used some fabric and a tag.

Supplies:
Stamps: Teeny Tiny Wishes
Ink: Real Red
Paper: Garden Green, Real Red & Whisper White cardstock
Other: Big Shot, Snow Burst embossing folder, Candy Cane Designer Fabric, White baker's twine, Large Oval punch, Scallop Oval punch, Sticky strip

Wednesday, July 13, 2011

Girly Baby Shower Favors


I put together 50 of these mini purse favors for a baby shower last month. I got the idea from my sideline demo Gina and the original idea came from Angie Juda another Stampin' Up! demo. The picture above shows the front side on the left and the back side on the right. 

It is a little hard to see in the photo, but where the brad is you just lift the top open and the inside holds two Hershey Nuggets. The mom-to-be knew she was having a girl and wanted pink-pink-pink. So I used a lot of Pretty in Pink and Pink Pirouette in these favors. I worked with her sister-in-law to pick everything out. She fell in love with the baby face from the Baby Bundle stamp set so we decided to put that on the back with the thank you sentiment on the front.

You can find all the materials used for these favors in my Online Store.

Let me know if you have any questions.

Supplies:
Stamps: Baby Bundle, Short & Sweet
Ink: Pretty in Pink, Basic Gray
Paper: Pretty in Pink, Pink Pirouette, Whisper White, Subtles Patterns Designer Series Paper Stack
Other: Pretty in Pink taffeta ribbon, rhinestone brads, Sticky strip, Word window punch, Owl builder punch, 1 3/4 scallop circle punch, 1 3/8 circle punch, 1 1/4 circle punch