Classes/Tutorials

Showing posts with label Stampin Up - Cookie Cutter Christmas. Show all posts

Wednesday, December 20, 2017

12 Days of Christmas # 9 - Quick & Easy Ghirardelli Treats


Happy Tuesday! For today’s project I made quick & easy Ghirardelli treat holders. These are easily mass produced for the holiday season. I used the Cookie Cutter Christmas stamp set and coordinating Cookie Cutter Builder punch. Here is a photo of the stamp set:

Take a look at my video tutorial to learn how easy it is to make these treats:


Place an order over $25 in my Online Store in the month of December with hostess code RC3D4A6J and I will send you five handmade cards as a thank you gift.

Thanks for stopping by today. I’ll be back on Thursday with another project to share.

Happy Stampin’,

Christine


Product List

Thursday, September 21, 2017

Stampin' Up Cookie Cutter Christmas Sparkly Santa Card

Stampin Up Cookie Cutter Christmas
Happy Thursday! Quick post for tonight it's been a crazy busy week this week. Thank goodness tomorrow is Friday. I am headed away on Saturday for my husband's birthday this weekend and I need some rest & relaxation big time!

So onto today's project. I am continuing my tradition of stamping at least one Christmas card per week. Have you started your Christmas cards yet? If not I can help you get caught up. Today's card features the Cookie Cutter Christmas stamp set. Here are the images in the set:

Measurements for this card:
Whisper White card base: 5.5" by 8.5" scored in half at 4 1/4"
Designer Series Paper: 1" by 5"
Whisper White cardstock layer: 3 3/4" by 5"
Basic Black cardstock layer: 3 7/8" by 5 1/8"

Place an order over $25 in my Online Store in the month of September using hostess code: UVETVS3R and you will get a thank you package in the mail from me with 5 handmade cards as a thank you.

I'll be back on Saturday with a Halloween project to share with you. Let me know if you have any questions about today's post.

Happy Stampin',
Christine

Supplies:

Saturday, August 26, 2017

Stampin Up Cookie Cutter Christmas Card

Stampin Up Cookie Cutter Christmas
Happy Saturday! Today’s card features the Cookie Cutter Christmas stamp set and coordinating Cookie Cutter Builder Punch. I hate to say this, but less than 4 months to Christmas. I am trying to make at least one Christmas card a week at a minimum. This would be perfect for a baker in your life.

I’m a tool girl and it is a rare occasion I don’t use my Big Shot and a framelit or thinlit set on a card. My next favorite tools are my punches. I always invest in stamp sets that have coordinating products to make it easy for creating.

Here is a photo of the Cookie Cutter Christmas stamp set:

Want to make this card at home? Here are the measurements:
Whisper White card base: 5.5" by 8.5" scored in half at 4 1/4"
Soft Suede layer: 3 7/8" by 5 1/8"
Whisper White layer: 3 3/4" x 5"

If you would like to place an order check out my Online Store by clicking here. If you place an online order over $25 in the month of August using the hostess code UW7X67MR I will send you a thank you package including 5 handmade cards and a package of Stampin' Dimensionals.

I’ll be back on Tuesday with another Tuesday Tip video tutorial project to share with you.

Have a wonderful weekend!

Happy Stampin’,
Christine

Supplies:
Stamps: Cookie Cutter Christmas
Ink: Soft Suede
Paper: Whisper White cardstock, Soft Suede cardstock, Silver Foil Sheets, Red Glimmer Paper
Other: Big Shot, Stitched Shapes Framelits Dies, Cookie Cutter Builder Punch, Mini Glue Dots, Multipurpose Liquid Glue

Friday, December 23, 2016

12 Days of Christmas - Day 7 & 8 - Last Minute Treats

Hi there,

I had today off my full-time job which it was great to get all our gifts sorted and wrapped. I also worked on some last minute treats for family.

First up is a candy bar holder which I had to make eight in total since I bought eight assorted candy bars in a school fundraiser last month. I used various plaid papers from the Warmth & Cheer Designer Series Paper Stack, coordinating cardstock in Garden Green & Crumb Cake, Teeny Tiny Wishes stamp set, Garden Green Marker, Classic Label Punch, and Kraft Rope Trim.

Stampin Up - Teeny Tiny Wishes
Next up is my Reindeer Rolo treat. I made up nine of these guys to bring to family on Christmas Day. My friend Brenda Quintana is a creative genius and shares projects made with rolos candy. The base holds one rolo treat. I stamped and punched out two reindeer for each treat, adhered them to each side of the base, and glued the top of their antlers back to back. I did color the reindeer ear & nose with a blender pen and the inside of my Early Espresso ink pad. I also colored in the antlers with a clear Wink of Stella glitter brush. On this project I used Cookie Cutter Christmas stamp set, Crumb Cake Cardstock, Early Espresso Ink, Cookie Cutter Builder Punch, and Multipurpose Liquid Glue.

Stampin Up - Cookie Cutter Christmas

Happy Stampin',
Christine


Wednesday, December 21, 2016

12 Days of Christmas - Day 6 - Cookie Cutter Christmas Tags

Stampin Up - Cookie Cutter Christmas
Hi there! I'm back again tonight with a quick post of some sweet & simple homemade Christmas tags. I am getting some gifts together for my Secret Santa potluck brunch tomorrow at work. I'm excited to get together with my co-workers and celebrate the holiday season. I work with a wonderful group of people during the day and we all work hard at supporting each other.

Since I'm still buying a few last minute gifts and still haven't got to my wrapping yet I thought tonight's post would be some quick tags. A set of tags makes a great hostess gift this time of year too! The tags came together very easily with the Cookie Cutter Christmas stamp set and coordinating punch and a few embellishments.

Want to make these tags? Here are the instructions:
1. Cut a piece of Crumb Cake cardstock to 1 3/4" x 4" and punch with the Scalloped Tag Topper punch
2. Cut a piece of Designer Series Paper to 1 3/4" x 2" and add to your tag with Multipurpose Liquid Glue
3. Stamp the images on a scrap piece of Crumb Cake cardstock and punch out with the Cookie Cutter punch
4. Color/embellish your stamped images as you wish. For the reindeer like my project yesterday I used a blender pen to color in his nose and ears then a clear wink of stella brush to color in his antlers. For the santa I used markers and the clear (his white felt) & gold (his belt) wink of stella brushes to color him. For the gingerbread man I added a red glimmer bow. Add the stamped images to your tag with two Stampin' Dimensionals.
5. Stamp the to and from image in the bottom left of the tag
6. Add a 15" piece of baker's twine to the top of the tag

Let me know if you have any questions about this project. Don't forget there is a big year-end closeout sale going on in my Online Store. If you would like to place an order with me click here.

Happy Stampin',
Christine

Supplies:
Stamps: Cookie Cutter Christmas
Ink: Early Espresso, Tuxedo Black Memento, Many Marvelous Markers
Paper: Candy Cane Lane Designer Series Paper (sold out), Crumb Cake cardstock, Whisper White cardstock, Red Glimmer Paper
Other: Cookie Cutter Builder Punch, Candy Cane Lane Baker's Twine, Clear Wink of Stella Glitter Brush, Gold Wink of Stella Glitter Brush, Blender Pen, Scalloped Tag Topper Punch, Stampin' Dimensionals, Multipurpose Liquid Glue, Mini Glue Dots

Tuesday, December 20, 2016

12 Days of Christmas - Day 5 - Cookie Cutter Christmas Petite Gift Bag

Stampin Up - Cookie Cutter Christmas
Hi there! I'm back tonight with a quick share. I am still trying to finish my shopping and then I need to start wrapping. For my small gifts I use Stampin' Up! supplies to create gift bags or decorate the gift packaging products.

Tonight after work I pulled out a petite gift bag and whipped up this adorable gift bag. I have made a few others like this before, but I don't think I shared the instructions so you will find those below. The petite gift bags are the perfect size to hold some cookies or fudge (they are food safe), candy, or a small gift.

Want to make this project?
1. Cut a piece of Designer Series Paper 3" x 6"
2. Cut a coordinating piece of Designer Series Paper 1.5" x 4" and punch one end with the Triple Banner Punch then adhere in the top center of the larger DSP piece.
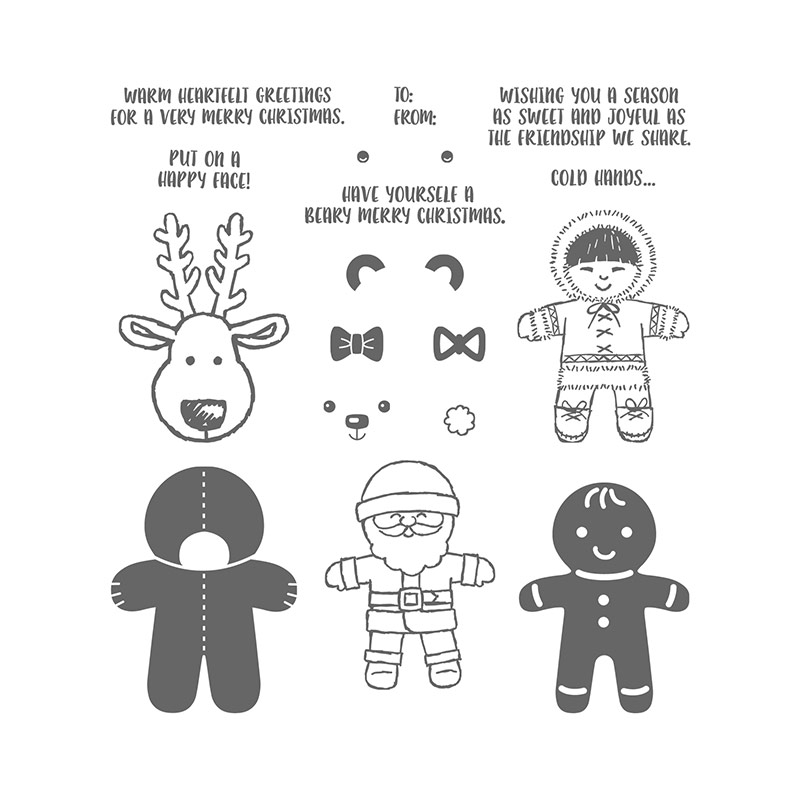
3. Stamp the reindeer from Cookie Cutter Christmas with Early Espresso ink on a scrap piece of Crumb Cake cardstock and punch out with the Cookie Cutter Builder Punch
4. If you want to add some dimension to your reindeer take a blender pen and color in his nose and the inside of his ears. I also colored in his antlers with my clear wink of stella pen.
5. Add reindeer to the banner with two Stampin' Dimensionals
6. Take 30" of baker's twine and double up then tie in a bow. Add bow to a glue dot then attach the glue dot to a gold binder clip.
7. Line up DSP piece to the top of the bag and clip to bag with the gold binder clip.

I'll be back to share another project tomorrow. Let me know if you have any questions.

Happy Stampin',
Christine

Supplies:
Stamps: Cookie Cutter Christmas
Ink: Early Espresso 
Paper: Candy Cane Lane Designer Series Paper (sold out), Crumb Cake Cardstock
Other: Petite Cafe Gift Bag, Candy Cane Lane Baker's Twine, Banner Triple Punch, Gold Binder Clip, Blender Pen, Clear Wink of Stella Glitter Brush, Mini Glue Dots, Stampin' Dimensionals, Multipurpose Liquid Glue