Classes/Tutorials

Showing posts with label Halloween Night Specialty Designer Series Paper. Show all posts

Friday, October 28, 2016

12 Days of Halloween - Day 10 - Cookie Cutter Halloween Ninja Card

Cookie Cutter Halloween Stampin Up
I have seen a few other demonstrators share cards on a Facebook group turning the mummy from the Cookie Cutter Halloween mummy stamp set into a ninja by stamping him and coloring him in with black ink. I had to try this idea to send a card to my nephew for Halloween.

I have to say Stampin’ Up! hit the ball out of the park with the Cookie Cutter stamp sets & a coordinating punch this holiday season. I am going to be sharing a bunch of Cookie Cutter Christmas ideas over the next few weeks once I get past the next week of stamping events. I have been burning the candle at both ends preparing for our Stamp Out Breast Cancer Fundraiser this weekend and Stampin’ Up!’s Onstage event the weekend after. I can’t complain though since I love what I do!

Want to make this card?
1.       Stamp your mummy on a scrap of Whisper White cardstock in Memento Tuxedo Black ink and punch him out with the Cookie Cutter Builder Punch
2.       Color him in with a Basic Black marker & Blushing Bride marker
3.       Score a piece of 8.5” x 11” Whisper White cardstock in half at 4.25” and then cut it at 5.5” to get your card base
4.       Cut a piece of Halloween Night Specialty Designer Series Paper at 3 3/4" x 5" and stamp trick or treat image. It reminded me of graffiti on a wall.
5. Cut a piece of Basic Black cardstock 3 3/4" x 3" and cut out with the Big Shot & tree from the Halloween Scenes Edgelits Dies then adhere to your DSP layer with Multipurpose Liquid Glue
6.       Cut a piece of Basic Black cardstock at 3 7/8" x 5 1/8" and adhere to your DSP layer then adhere to your white card base
7.       Add your ninja with Stampin’ Dimensionals
8. Cut a bat out of a scrap of Basic Black cardstock from the Halloween Scenes Edgelits Dies on your Big Shot

I linked the products I used below. Let me know if you have any questions.

Stamps: Cookie Cutter Halloween & Spooky Fun
Ink: Tuxedo Black Memento, Basic Black Marker, Blushing Bride Marker
Paper: Halloween Night Specialty Designer Series Paper, Basic Black Cardstock, Whisper White Cardstock
Other: Big Shot, Halloween Scenes Edgelits Dies, Cookie Cutter Builder Punch, Stampin’ Dimensionals, Snail Adhesive, Simply Scored, Stampin' Trimmer, Multipurpose Liquid Glue

Happy Stampin’,
Christine

Wednesday, October 26, 2016

12 Days of Halloween - Day 9 - Spooky Fun Banner Card

Spooky Fun Stampin Up
Quick post for tonight. Do you send Halloween cards to family & friends? I love to send cards for all occasions including Halloween. This card is making its way into the mailbox to a loved one out of state. If you don't make Halloween cards you could easily change the paper and images on this card for any occasion.

Want to make this card?
1. Stamp the bat, eek, pumpkin face, and spider on a scrap of Whisper White cardstock with Memento Tuxedo Black ink
2. Punch out the images with a 3/4" circle punch
3. Cut a piece of Whisper White cardstock 3 3/4" x 5" and stamp Happy Halloween in lower right corner with Memento Tuxedo Black Ink
4. Cut a piece of Basic Black cardstock 3 7/8" x 5 1/8" and adhere to white layer with Fast Fuse adhesive
5. Take a piece of 8 1/2" x 11" Whisper White cardstock and score it at 4 1/4" then cut it at 5 1/2" to get your card base - you will get two card bases from one sheet of cardstock.
6. Cut four pieces of Halloween Night Specialty Designer Series Paper at 1" x 2" then punch one end of them with the Banner Triple Punch and add them to the white layer mimicking a banner
7. Adhere the stamped circle imaged on the banners with Stampin' Dimensionals
7. Make two bows with the Halloween Night Baker's Twine & add to the left & right corners of the banner with glue dots

I linked the products I used below. I am busy this week preparing for our annual Stamp Out Breast Cancer fundraiser, but I will be sharing a few more Halloween projects.

Happy Stampin',
Christine

Supplies:
Stamps: Spooky Fun
Ink: Tuxedo Black Memento
Paper: Whisper White Cardstock, Basic Black Cardstock, Halloween Night Specialty Designer Series Paper
Other: Banner Triple Punch, 3/4" Circle Punch, Fast Fuse Adhesive, Stampin Dimensionals, Halloween Night Baker's Twine, Mini Glue Dots, Multipurpose Liquid Glue

Saturday, October 22, 2016

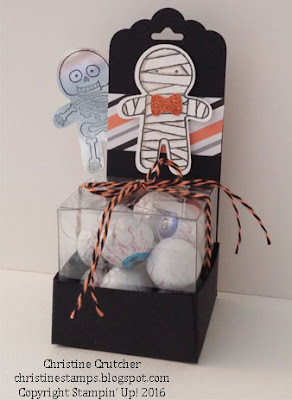
12 Days of Halloween - Day 7 - Mummy Tiny Treat Box

Cookie Cutter Halloween Stampin Up
I'm back today to share my 7th post in my Halloween series. The weather the latter half of this week has been rainy which has made taking photos of my projects challenging. My go to place has been photographing on my back deck. I need to start planning ahead for when we get snow since that will be impossible. 

I am blogging at the library this morning since we are heading out of town to celebrate my mother-in-law's 70th birthday for the rest of this weekend, but I had some time yesterday and this morning to make a few projects to share.

I made two of these mummy boxes for my in-laws and our aunt who we will be visiting with over the weekend. I CASE'd (Copy & Share Everything) a box my friend Selene made for me last month at her holiday catalog rollout event. Since I was giving one to my mother-in-law I had to use the mummy stamp from Cookie Cutter Halloween as the focal point. Get it? A mummy for mummy!

Want directions to make this project?
1. Stamp the mummy on Whisper White cardstock in Tuxedo Black Memento ink and punch out with the Cookie Cutter Builder Punch
2. Color your mummy with a Crumb Cake ink pad and blender pen to make him look a bit aged and wrapped like a mummy
3. Stamp the skeleton on Silver Foil paper with a Black Stazon pad and punch out with the Cookie Cutter Builder Punch
4. Punch out a bow tie in Pumpkin Pie Glimmer Paper from the Cookie Cutter Builder Punch & add to the mummy with a glue dot
5. Cut a piece of Basic Black cardstock 4 1/8" square then score at 1" on all 4 sides. Cut two score lines on each side of the box and adhere to make the box bottom.
6. Cut a piece of Basic Black cardstock 2" x 7". Score the box at 2" then punch the non-scored side with the Scallop Tag Topper punch.
7. Glue the bottom of the tag to the bottom of the square box so it becomes the back of the box.
8. Cut a piece of Halloween Night Specialty Designer Series Paper 1" x 2" and add across the middle of the box back.
9. Add your mummy with a Stampin' Dimensional.
10. Add two glue dots to the skeleton one on his hand and one on his foot and add to the box so he is peeking out.
11. Fill a Clear Tiny Treat Box with candy. (eyeballs came from Dollar Tree)
12. Add Halloween Night Baker's Twine around your box and you're done

Let me know if you have any questions. I linked the products I used below.

I hope you find some time to be crafty this weekend!

Happy Stampin',
Christine

Supplies:

Tuesday, October 11, 2016

12 Days of Halloween - Day 4 - Spooky Fun Halloween Card

Spooky Fun Stampin Up
Spooky Fun Stampin' Up!
Back with day 4 of my 12 days of Halloween posts. I decided to share a card that I have mass produced to create 50 of them for my vendor event on Friday night. Anybody you joins my mailing list or enters my door prize will receive this card.

Since I made 50 of these I kept them pretty simple showing off the baker's twine, designer series paper, glimmer paper, and stamp. Change up the colors and sentiment this is an easy card for any occasion or holiday.

Step-by-step instructions:
1. Score a piece of 8.5"x11" Pumpkin Pie cardstock at 4 1/4" on the short side and then cut in half at 5 1/2" to make two card bases
2. Cut a piece of Whisper White cardstock 3 3/4" x 5"
3. Cut a piece of Basic Black cardstock 4" x 5 1/4"
4. Cut a bat from Pumpkin Pie Glimmer Paper using the Big Shot & Halloween Scenes Edgelits Dies
5. Punch a 1 3/4" circle from the Halloween Night Specialty Designer Series Paper (polka dot)
6. Punch a 2" circle from Basic Black cardstock and adhere circles together with snail adhesive
7. Stamp the Happy Halloween sentiment in the lower right corner of the white layer
8. Adhere the white and black layers together with fast fuse adhesive
9. Add a strip of baker's twine across the middle of the card and adhere with mini glue dots
10. Add the circle over the baker's twine with stampin' dimensionals
11. Make a bow and add to the left of the circle with a mini glue dot
12. Add the bat to the circle using a glue dot
13. Adhere the layer to the card base with multipurpose liquid adhesive

You can purchase all the supplies to make this card in my Online Store. I have linked the products I used below. Let me know if you have any questions.

Happy Stampin',
Christine

Supplies:
Stamps: Spooky Fun
Ink: Tuxedo Black Memento
Paper: Halloween Night Specialty Designer Series Paper, Pumpkin Pie Cardstock, Whisper White Cardstock, Basic Black Cardstock, Pumpkin Pie Glimmer Paper
Other: Big Shot, Halloween Scenes Edgelits Dies, 1 3/4" Circle Punch, 2" Circle Punch, Halloween Night Baker's Twine, Snail Adhesive, Stampin' Dimensionals, Mini Glue Dots, Fast Fuse Adhesive, Multipurpose Liquid Glue

Monday, October 10, 2016

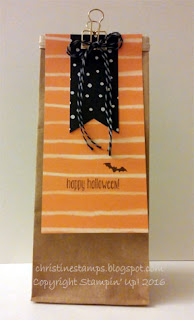
12 Days of Halloween - Day 3 - Petite Cafe Gift Bag

Petite Cafe Gift Bag Stampin Up
Petite Cafe Gift Bag Stampin' Up!
Last night our internet was down (good old Comcast) so I couldn't post my 3rd project in my 12 days of Halloween series so here it is for you! This is a quick & simple petite cafe gift bag inspired by page 50 of the Stampin' Up! holiday catalog.

Sorry the photo isn't the greatest it was raining cats & dogs here yesterday. We need the rainfall since we have been under a major drought over the last several months although I do wish mother nature saved the rainfall for a work day. We spent the afternoon in Boston walking around huddled under a large golf umbrella, but we made the best of it.

How-to make the petite cafe gift bag:
1. Cut a piece of Designer Series Paper 3" x 6" (orange striped)
2. Cut another piece of Designer Series Paper 1.5" x 3" (silver polka dot) and punch bottom with the Banner Triple Punch
3. Stamp the Happy Halloween image from Spooky Fun
4. Stamp the bat image from Spooky Fun above Happy Halloween
5. Adhere the polka dot banner to the orange striped piece with fast fuse adhesive
6. Add the paper banners to the gift bag with a gold binder clip
7. Make a double bow out of twine and attach to the gold binder clip with a mini glue dot

Did you know the bags are food safe? They are a nice size at 3.5" x 2.5" x 8" and would fit cookies, popcorn, or a nice amount of candy for any ghosts & goblins for Halloween! I am going to bring a few to my event this Friday night to dress up my table.

I linked the products I used below. Let me know if you have any questions.

Happy Stampin',
Christine

Supplies:
Stamps: Spooky Fun
Ink: Tuxedo Black Memento
Paper: Halloween Night Specialty Designer Series Paper
Other: Banner Triple Punch, Halloween Night Baker's Twine, Petite Cafe Gift Bags, Gold Binder Clip, Mini Glue Dots, Fast Fuse Adhesive

Saturday, October 8, 2016

12 Days of Halloween - Day 2 - 8x10 Frame

Spooky Fun Stampin Up
Spooky Fun Stampin' Up!
I'm back today to share a 8x10 frame I put together also for my desk at work using some of the Halloween Night suite of products from Stampin' Up! I found my inspiration for this frame from page 50 of the 2016 Holiday catalog. My frame is a little different, but has most of the same elements.

I might make a few of these to bring to an event I am headed to on Friday night. I really enjoy using my supplies to create home decor items and would love to show you how to make this frame if you are local & interested in a class let me know. You might end up seeing this frame dressed up for other holidays down the road.

Let me know if you have any questions. I linked the products I used on the frame below.

I hope you find some time this weekend to get crafty!

Happy Stampin',
Christine

Supplies:
Stamps: Spooky Fun