Classes/Tutorials

Showing posts with label Easter. Show all posts

Sunday, April 21, 2019

Gingham Gala Easter Baskets


Happy Sunday and Happy Easter! It was a nice day celebrating with family. The weather was a little rainy so the egg hunt was indoors, but we were able to go outside and enjoy the afternoon a bit. There was archery and toy balsa wood airplanes to keep us busy. I have to go to a general store to get one of the airplanes. It was lots of fun flying it around the yard.

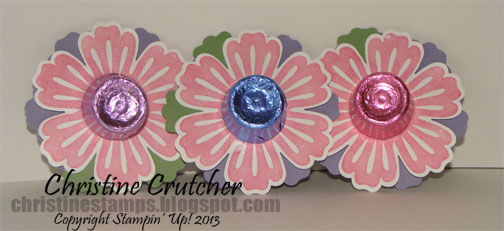
Of course I had to bring some Easter baskets along. These could not be easier to make. I used the Gingham Gala Designer Series Paper and Daisy Punch, some cardstock scraps, ribbon, and adhesives. Here is a look at a trio of them:


Measurements:
Whisper White cardstock – 3” x 11” strips
Scraps of Daffodil Delight, Grapefruit Grove, & Highland Heather cardstock
Flax ribbon – 10” pieces for handle, 12” piece for bow

Tips:
  • Carefully curl the daisies with a bone folder
  • Pull the 12” piece of ribbon apart down the middle and tie two strands into bows
  • Score the DSP at 2” on all four sides then cut up to the 2” mark on two sides. Bring points of two edges together and adhere to create basket.
All the products I used are noted below. My host code for April is AH9G3R67 if you would like to place an order in my Online Store.

I’ll be back on Tuesday with another project to share. Let me know if you have any questions.

Happy Stampin’,
Christine

Product List

Wednesday, March 30, 2016

Sale-A-Bration ends tomorrow!


Quick post tonight as I am headed out to meet a friend for dinner & stamping. I made the above treats for my family for Easter on Sunday. I used two products that are free during Sale-A-Bration which ends tomorrow Thursday, 3/31 the cute Honeycomb Happiness stamp set and the Metallics Glitter Tape. I made 18 treats and wrapped the glitter tape around the entire project putting the ends in the front so I could cover them up with the circle. I still had some of the white glitter tape left after making 18 of them! 

I wanted to share this project since I thought it would be adorable for a baby shower favor or even a party favor with changing the colors & sentiment.

Christine's Tip: Use Tear & Tape adhesive or Fast Fuse when putting together your 3D projects for a strong bond. The Mini Treat Bag Thinlit die is so easy to put together after you have your pieces cut.

I hope you liked my quick & cute Easter treats and get to create something crafty this week.

So again Sale-A-Bration ends tomorrow, Thursday, 3/31. Any $50 order you get to pick a Free item from the below. There are Weekly deals specials and special pricing on Paper Pumpkin subscriptions. Check it all out in my Online Store. Let me know if you have any questions.


Happy Stampin',
Christine

Stamps: Honeycomb Happiness (Sale-A-Bration), Teeny Tiny Wishes
Ink: Hello Honey
Paper: Mint Macaron Cardstock
Other: Big Shot, Magnetic Platform, Mini Treat Bag Thinlit Die, Tear & Tape Adhesive, Blender Pen, 2 1/2" circle punch, Metallic Glitter Tape (Sale-A-Bration), Stampin Dimensionals

Sunday, March 31, 2013

Happy Easter!


Here is a simple treat made using the Two Tags Die for the Big Shot. You could easily change it up for any occasion and they go together pretty quickly.

Start with a piece of cardstock 8.5 x 2.5 then score in half at 4.25 on your Simply Score board. Run through your Big Shot on the skinny Two Tags die that looks like a bookmark. Tip: Make sure you put the folded cardstock above the cut line on the die as you want to make a little folder to adhere your candy or treat inside. 

Then take your 3/4" circle punch to punch a handle at the top center - you will need this hole to tie your ribbon. Then stamp your image with a Versamark pad creating a custom background - that creates a nice watermark look - use can stamp as much or as little as you want. You could add DSP here if you prefer.

I used about 12" for my ribbon bow.

For the tag I used the coordinating colors from my stamped image. I decided to match the ribbon and tag base the same color Pretty in Pink. Then I just played around with the coordinating colors. I used my markers for the stamped image.

Inside my treat is an egg shaped York peppermint patty treat. Yum! I added some snail adhesive inside and stuck my treat in to hold it in place. I decided to use the egg stamp since my treat is egg shaped. How cute is that! I got 16 treats from one bag of Yorks which is four pieces of cardstock and a pretty economical favor.

Hope you have a wonderful Easter or Passover with your family and friends.

Happy Stampin',
Christine

Supplies:
Stamps: Spring Sampler
Ink: Wisteria Wonder, Pretty in Pink, Pool Party markers, Versamark pad
Paper: Wisteria Wonder, Pretty in Pink, Pool Party, Whisper White cardstock
Other: Big Shot, Two Tags Die, 3/4 circle punch, 7/8 scallop circle punch, 1 1/4 circle punch, 1 3/8 circle punch, dimensionals, linen thread, Pretty in Pink 1/4" stitched grosgrain ribbon

Wednesday, March 20, 2013

Happy Spring!


Happy Spring to you! I hope it is beginning to feel like spring for you. Here in Massachusetts where are far, far away from any Spring weather. It took a long time for 'Ol Man Winter to pay us a visit this year and now he won't leave.

At the rate I am going I will be done with my Easter treats a week early. Woo-hoo! I will share my other Easter project later this week.

These flowers were popular last Spring and I remembered how simple and cute they were. First I stamped the Mixed Bunch flower with my Regal Rose marker on Whisper White cardstock. You can get 12 from one sheet of cardstock. Then I punched out a modern label punch in Wild Wasabi cardstock for each flower. I cut the modern label in half and adhered in a corner of the flower to depict leaves. Then I punched out flowers from the Blossom punch in Wisteria Wonder and layered onto my flower. You finish off the project with a rolo and a glue dot.

One bag of rolos made 36 flowers for me so it is a very economical treat for classmates, coworkers, friends, and family.

Stay tuned for another Easter project later this week.

Happy Stampin',
Christine

Supplies:
Stamps: Mixed Bunch
Ink: Regal Rose marker
Paper: Whisper White, Wisteria Wonder, Wild Wasabi cardstock
Other: Blossom punch, Modern label punch, dimensionals, glue dots

Sunday, April 15, 2012

Happy Easter week!


Ok so I am a little late getting this project posted, but considering today is Greek Easter I guess I can say it has been an Easter week this year. We celebrated last week, but I do have several friends celebrating today. I always bring my family little treats for holidays so I had to use the NEW Petite Purse die for some cute, cute, cute Easter treats!

These are pretty small they hold 1 mini York peppermint pattie. Yummy!!! Thanks Selene for that tip! If you put Hershey nuggets or kisses you could hold several. You will be seeing lots of this Petite Purse die coming up soon. I have lots of ideas - birthday party favors, wedding favors, baby shower favors, etc. Don't you think the mini purse is just adorable?

For the colors I thought they reminded me of Easter eggs. The colors are Pool Party & Wisteria Wonder cardstock they are part of the NEW in-colors. I have to say that is one thing about Stampin' Up! they are always fresh with color updates. Speaking of fresh the new catalog is coming out 6/1 and the first retired stamp set list came out today. I will share more details on that tomorrow.

For the DSP on the front flap I CASE'd Barb Mullikin and I think it is a fantastic idea. She used the scallop oval punch and she has a FREE tutorial on her blog here.

All supplies below can be purchased in my Online Store.

Let me know if you have any questions.

Happy Stamping!
Christine

Supplies:
Stamps: Tiny Tiny Wishes
Ink: Black stazon
Paper: Sweet Shop Specialty Designer Series Paper, Pool Party, Wisteria Wonder, Whisper White cardstock
Other: Big Shot, Petite Purse Bigz L Die, Word window punch, Scallop oval punch, Sticky strip

Sunday, April 24, 2011

Happy Easter!


Happy Easter to you. I hope you have a lovely day celebrating with family. The sun is currently out and shining so hopefully the rain has gone away for today. This year we have family visiting from across the country so it has been a nice Easter weekend so far. We have a tradition on my Mom's side that we get together and make homemade Italian pasta cappelletti's for Christmas and Easter dinner so it is always a dinner you look forward to.

I am sharing two petal cone Easter treats. I was inspired by one I saw on Stampin' Connection, the forum for Stampin' Up! demonstrators. This is just the right size for a little treat. I fit a small bag of jelly beans, a few Peanut butter cups and a little bunny. With these I just popped them into a cello bag and tied off the top with a piece of ribbon. You could also add a piece of ribbon and make a hanging treat. 

So these are made with the Petal Cone die and it is two dies cut out and adhered together with Sticky strip. I cut out the extra chocolate scallop pieces for the front and back to dress it up a bit. The scallop pieces are also right in the Petal Cone die. After I had these put together I realized the celery one reminds me of Mint Chocolate Chip ice cream. Yum!
Supplies:
Stamps: All Holidays
Ink: Chocolate Chip
Paper: So Saffron, Certainly Celery, Chocolate Chip, Whisper White
Other: Big Shot, Petal Cone die, 1 3/4" Scallop circle punch, 1 1/4 circle punch, 1 3/8 circle punch, Sticky strip

Friday, April 22, 2011

Petal Cone Carrots


This carrot treat made out of the petal cone die was demonstrated at the Regional event back in March. I thought it was perfect to make a bunch for Easter and put a little bunny inside. I have seen these all over blogs the past few weeks filled with lots of different treats.

These go together very quickly. Half a sheet of Pumpkin Pie 8.5 x 11 cardstock then a small piece of Old Olive for the scallop top part. Then a small piece of Whisper White for the banner. All three of the pieces come in the Petal Cone die for the Big Shot. You cut off one of the top flaps then adhere along the side with sticky strip. 

I decided to add a bit of texture to the front so ran through my Big Shot with the Perfect Polka dot embossing folder before adhering. I also decided to add a faux bow with my 1/4" Old Olive ribbon & bitty button. Can you also see that my banner is curled? You can get this effect by curling your paper using your bone folder like you are curling ribbon for a gift.

Supplies:
Stamps: Teeny Tiny Wishes
Ink: Old Olive
Paper: Pumpkin Pie, Old Olive, Whisper White
Other: Big Shot, Petal Cone die, Perfect Polka Dots embossing folder, Old Olive 1/4" grosgrain ribbon, bitty button, linen thread

Saturday, April 2, 2011

Easter Pencil Treats

The sun is shining brightly this morning so it makes me forget that it snowed here yesterday. Hopefully the snow is gone in the next few days as we should hit 50 degrees. What does this all mean? Spring is here and Easter will be right around the corner. I always like to make some treats that don't involve candy.


I showed this pencil treat for Valentine's Day. These are fairly simple to make:
- Cut your cardstock to 2" x 11" (you can get 4 from one piece of 8.5" x 11") and score at 6.5 & 6 7/8
- Cut your Designer Series Paper to 1 3/4 x 6 1/8 and 1 3/4 x 3 7/8
- Adhere DSP to cardstock shorter piece in the front and longer piece in the inside. You could do another longer piece for the back, but I kept it just cardstock
- Punch a hole with a 1" circle punch in the bottom section only about 1/2" down from the top
- Add sticky strip above the punched hole and adhere to the back
- Add your pencils you could also add a pencil & lollipop but I was going for a non-candy item
- Add your ribbon around and tie in a knot or bow

I did use mostly retired products in making these. The ribbons are currently available in my Online Store in the Clearance Rack for amazing prices.

If you are local I am selling these for $2 each. They come in green, yellow, blue or pink as shown.

Let me know if you have any questions.

Supplies:
Stamps: Year Round Fun II (retired)
Ink: Black Stazon, Bashful Blue, So Saffron, Certainly Celery, Perfect Plum, Pink Pirouette markers
Paper: Delicate Dots DSP (retired)
Other: 1 3/4 scallop circle punch, 1 3/8 circle punch, 1 1/4 circle punch, Ribbon Bundle (retired), Pink Pirouette 5/8 striped grosgrain ribbon (retired), pencils (local dollar store)

Tuesday, March 15, 2011

Spring Easter Card Swap


Here is my card swap from last Friday night's team meeting at Selene's. The swap theme was Spring so I definitely think the color combination of Daffodil Delight, Pretty in Pink and Marina Mist fits that nicely. I received a box of goodies from Stampin' Up! last week so I was determined to use my new Fun Flowers Big Shot die from the Occasions Mini catalog.

I used a technique called Inlaid embossing on this card. You can say this card is probably Big Shot over the top! I used the Top Note Die to cut the Daffodil and white layers then I cut out the edge on the white layer and matted to the Daffodil. Then I cut the flowers from the Fun Flowers die in Daffodil & Pretty in Pink. Then I glued the flowers to the white layer and ran all four layers through the Big Shot in my Square Lattice embossing folder. It adds a nice quilted look on my card. I was able to bend up the edges on the pink flower for some dimension then I added the Daffodil button.

Supplies:
Stamps: Teeny Tiny Wishes
Ink: Marina Mist
Paper: Marina Mist, Daffodil Delight, Pretty in Pink, Whisper White
Other: Big Shot, Top Note Die, Fun Flowers Die, Square lattice embossing folder, Brights button in Daffodil, linen thread, Scallop oval punch, Oval punch