Classes/Tutorials

Showing posts with label Cookie Cutter Halloween. Show all posts

Monday, October 31, 2016

12 Days of Halloween - Day 12 - Extra Large Sour Cream Container

Cookie Cutter Halloween Stampin Up
Sometime in the past year or so I remember seeing an extra large sour cream container shared by one of the Stampin’ Up! Artisans. They are an elite team of demonstrators from around the world who share amazing projects on their blogs semi-monthly. They always inspire me with their creations.

Sour cream containers are traditionally made from a 6” x 6” or smaller piece of our Designer Series Paper and are perfect to hold a small amount of candy or a small gift. I decided to create an extra large sour cream container for my hubby for Halloween and fill it with our leftover Halloween candy for trick-or-treaters. This extra large sour cream container is made with a piece of 12" x 12" paper and holds 10 fun size twix bars with room for more.

I linked the products I used below. Let me know if you have any questions.

Supplies:
Stamps: Cookie Cutter Halloween
Ink: Tuxedo Black Memento, Pumpkin Pie marker
Paper: Halloween Night Specialty Designer Series Paper, Whisper White Cardstock
Other: Halloween Night Baker's Twine, Cookie Cutter Builder Punch, Stampin' Dimensionals, Whisper White Baker's Twine, Tear & Tape Adhesive

Happy Stampin’,
Christine

Friday, October 28, 2016

12 Days of Halloween - Day 10 - Cookie Cutter Halloween Ninja Card

Cookie Cutter Halloween Stampin Up
I have seen a few other demonstrators share cards on a Facebook group turning the mummy from the Cookie Cutter Halloween mummy stamp set into a ninja by stamping him and coloring him in with black ink. I had to try this idea to send a card to my nephew for Halloween.

I have to say Stampin’ Up! hit the ball out of the park with the Cookie Cutter stamp sets & a coordinating punch this holiday season. I am going to be sharing a bunch of Cookie Cutter Christmas ideas over the next few weeks once I get past the next week of stamping events. I have been burning the candle at both ends preparing for our Stamp Out Breast Cancer Fundraiser this weekend and Stampin’ Up!’s Onstage event the weekend after. I can’t complain though since I love what I do!

Want to make this card?
1.       Stamp your mummy on a scrap of Whisper White cardstock in Memento Tuxedo Black ink and punch him out with the Cookie Cutter Builder Punch
2.       Color him in with a Basic Black marker & Blushing Bride marker
3.       Score a piece of 8.5” x 11” Whisper White cardstock in half at 4.25” and then cut it at 5.5” to get your card base
4.       Cut a piece of Halloween Night Specialty Designer Series Paper at 3 3/4" x 5" and stamp trick or treat image. It reminded me of graffiti on a wall.
5. Cut a piece of Basic Black cardstock 3 3/4" x 3" and cut out with the Big Shot & tree from the Halloween Scenes Edgelits Dies then adhere to your DSP layer with Multipurpose Liquid Glue
6.       Cut a piece of Basic Black cardstock at 3 7/8" x 5 1/8" and adhere to your DSP layer then adhere to your white card base
7.       Add your ninja with Stampin’ Dimensionals
8. Cut a bat out of a scrap of Basic Black cardstock from the Halloween Scenes Edgelits Dies on your Big Shot

I linked the products I used below. Let me know if you have any questions.

Stamps: Cookie Cutter Halloween & Spooky Fun
Ink: Tuxedo Black Memento, Basic Black Marker, Blushing Bride Marker
Paper: Halloween Night Specialty Designer Series Paper, Basic Black Cardstock, Whisper White Cardstock
Other: Big Shot, Halloween Scenes Edgelits Dies, Cookie Cutter Builder Punch, Stampin’ Dimensionals, Snail Adhesive, Simply Scored, Stampin' Trimmer, Multipurpose Liquid Glue

Happy Stampin’,
Christine

Sunday, October 23, 2016

12 Days of Halloween - Day 8 - Cookie Cutter Halloween Granola Bar Treat

Cookie Cutter Halloween Stampin Up

Cookie Cutter Halloween Stampin Up

I'm back today to share my 8th post in my Halloween series. I always have granola bars in the house to take to work for a snack. My favorite lately is the protein bars from Nature Valley. Yum! Of course the last time we went to BJ's Wholesale Club we had a coupon for Annie's products so I bought a pack of the Chocolate chip granola bars.

I got to thinking the other day that our 2" x 8" cello bags would be the perfect size for granola bars! I haven't googled yet to see if someone else made this discovery too. So this is a super simple 5 minute project and would be a great alternative to giving trick-or-treaters or classmates candy. A certified organic granola bar at least is a wee bit healthier.

Want to make this project?
1. Stamp the skeleton from Cookie Cutter Halloween on a scrap of Whisper White cardstock with Tuxedo Black Memento ink. Tip: I cut my cardstock into 2" strips to save on waste.
2. Punch him out with the Cookie Cutter Builder Punch
3. Punch out a heart with Pumpkin Pie Glimmer Paper & the Cookie Cutter Builder Punch
4. Roll up a mini glue got and add the heart to your skeleton
5. Add your granola bar to a 2" x 8" cello bag
6. Tie a bow with the Halloween Night Baker's Twine at the top of your bag. Tip: I like to double up this baker's twine.
7. Add your skeleton towards the bottom with Stampin' Dimensionals

Let me know if you have any questions about this project. I linked the products I used below.

Happy Stampin',
Christine

Supplies:

Saturday, October 22, 2016

12 Days of Halloween - Day 7 - Mummy Tiny Treat Box

Cookie Cutter Halloween Stampin Up
I'm back today to share my 7th post in my Halloween series. The weather the latter half of this week has been rainy which has made taking photos of my projects challenging. My go to place has been photographing on my back deck. I need to start planning ahead for when we get snow since that will be impossible. 

I am blogging at the library this morning since we are heading out of town to celebrate my mother-in-law's 70th birthday for the rest of this weekend, but I had some time yesterday and this morning to make a few projects to share.

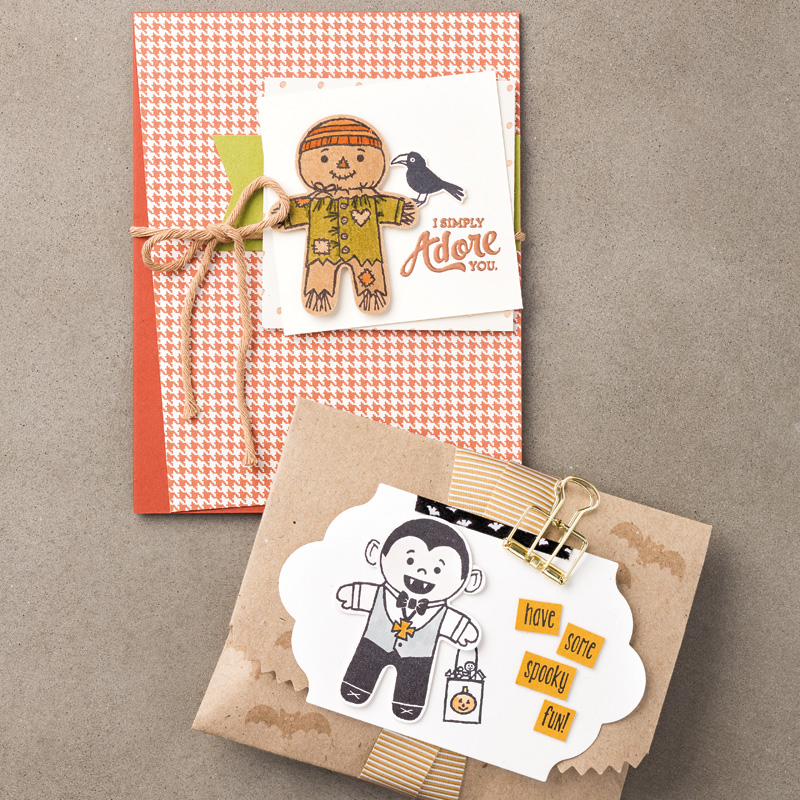
I made two of these mummy boxes for my in-laws and our aunt who we will be visiting with over the weekend. I CASE'd (Copy & Share Everything) a box my friend Selene made for me last month at her holiday catalog rollout event. Since I was giving one to my mother-in-law I had to use the mummy stamp from Cookie Cutter Halloween as the focal point. Get it? A mummy for mummy!

Want directions to make this project?
1. Stamp the mummy on Whisper White cardstock in Tuxedo Black Memento ink and punch out with the Cookie Cutter Builder Punch
2. Color your mummy with a Crumb Cake ink pad and blender pen to make him look a bit aged and wrapped like a mummy
3. Stamp the skeleton on Silver Foil paper with a Black Stazon pad and punch out with the Cookie Cutter Builder Punch
4. Punch out a bow tie in Pumpkin Pie Glimmer Paper from the Cookie Cutter Builder Punch & add to the mummy with a glue dot
5. Cut a piece of Basic Black cardstock 4 1/8" square then score at 1" on all 4 sides. Cut two score lines on each side of the box and adhere to make the box bottom.
6. Cut a piece of Basic Black cardstock 2" x 7". Score the box at 2" then punch the non-scored side with the Scallop Tag Topper punch.
7. Glue the bottom of the tag to the bottom of the square box so it becomes the back of the box.
8. Cut a piece of Halloween Night Specialty Designer Series Paper 1" x 2" and add across the middle of the box back.
9. Add your mummy with a Stampin' Dimensional.
10. Add two glue dots to the skeleton one on his hand and one on his foot and add to the box so he is peeking out.
11. Fill a Clear Tiny Treat Box with candy. (eyeballs came from Dollar Tree)
12. Add Halloween Night Baker's Twine around your box and you're done

Let me know if you have any questions. I linked the products I used below.

I hope you find some time to be crafty this weekend!

Happy Stampin',
Christine

Supplies:

Monday, October 17, 2016

12 Days of Halloween - Day 5 - Cookie Cutter Halloween Card

Cookie Cutter Halloween Stampin Up
So I had an event this past Friday night and got a little off track with my Halloween posts. So I will be catching up over the next week. Today's post is a card I made over the weekend for a thank you for a customer order. I made this for a creative challenge where the criteria was a thank you card on a notecard. Have you checked out the note cards in my Online Store? They are a great deal as you receive 20 cards with envelopes for $6 and they are all cut & scored for you.

I kept my card simple just adding a layer of the Halloween Night Specialty Designer Series Paper in the pumpkin grid pattern, Halloween Night Baker's twine, a punched sentiment, and a punched scarecrow. I colored the scarecrow with a blender pen and my ink pads on watercolor paper.

Christine's Tip: If you have never tried watercoloring with blender pens you want to squeeze your ink pad while it is closed then open it up and pick up some color with your blender pen in the lid of the ink pad. You can control how dark or light you want with your coloring. It reminds me of coloring with crayons when I was a kid which I loved.

I have linked the products I used on my card below. Let me know if you have any questions.

Happy Stampin',
Christine

Supplies:
Stamps: Cookie Cutter Halloween & Thoughtful Banners
Ink: Tuxedo Black Memento, Real Red, Dapper Denim, Pumpkin Pie
Paper: Halloween Night Specialty Designer Series Paper & Watercolor
Other: Whisper White Note Cards & Envelopes, Cookie Cutter Builder Punch, Classic Label Punch, Blender Pen, Mini Glue Dots, Stampin Dimensionals, Snail Adhesive, Halloween Night Baker's Twine

Monday, September 12, 2016

Cookie Cutter Halloween Clear Tiny Treat Boxes!

Cookie Cutter Halloween Stampin' Up!

Quick post for tonight. I whipped up these super simple treat boxes over the weekend for a creative challenge. I don't have any Halloween Designer Series Paper, so I used some Pumpkin Pie cardstock to make belly bands. With the belly band the recipient can slide it right off to get to the treats inside. I didn't buy any Halloween candy yet to put inside. These boxes are clear so you can see through them.

Christine's Tip: When making your belly band make sure they are not too tight so the recipient can slide it off & on easily. For these boxes the length of my cardstock was about 9.5 inches and the width 1.5 inches.
I linked the products I used on this project below. You can shop 24/7 in my Online Store. Don't forget about the current Stampin' Up! promotions:

Special Offers through 9/21 - save 25% on items in my Online Store:

SpecialOffers_Banner_Demo_Sept2016_NA

Paper Pumpkin monthly subscription BOGO sale through 10/10:

PP_BOGO_Demo-Current

Supplies:
Stamps: Cookie Cutter Halloween
Ink: Basic Gray, Crumb Cake, Tuxedo Black Memento, Pumpkin Pie Marker
Paper: Pumpkin Pie cardstock, Very Vanilla cardstock, Whisper White cardstock
Other: Cookie Cutter Builder Punch, Blender Pen, Whisper White Baker's Twine, Stampin Dimensionals, Multipurpose Liquid Glue, Clear Tiny Treat Boxes

Happy Stampin',
Christine

Sunday, September 4, 2016

My Favorite Item for Halloween is...

Cookie Cutter Halloween Stampin' Up!
Cookie Cutter Halloween! I am in love with these little guys. We are busy trying to soak in the sunshine of summer before Hurricane/Tropical Storm Hermine makes her way up into New England tonight/tomorrow. If it starting to feel a little cooler here. Yesterday we were up in Gloucester in the afternoon and I had my hoodie on most of the time.

I made this goodie bag out of the Kraft tag a bag gift bags. The ribbon is not glued to the bag so it can slide right off to get to the goodies inside. This would be super easy to make a bunch for trick-or-treaters or co-workers for Halloween. I did base my design on the one Stampin' Up! shared in the holiday catalog. Here is the image:


Christine's Tip: I used the banner from the Mini Treat Bag Thinlit Dies, but I kept the top part of my cardstock above the edge so it cut the image straight across on the top. I hope that makes sense let me know if you have any questions. Here is a visual shot of the dies in the set.


I linked the products I used below.

If you are local to Lowell, MA let me know if you would want to have a class to make these treats?

Happy Stampin',
Christine
Supplies:

Wednesday, August 31, 2016

Sneak Peek! Cookie Cutter Halloween Skeleton Tag

Cookie Cutter Halloween Skeleton tag
Cookie Cutter Halloween Skeleton Tag

Oh my goodness! I have been having so much fun making some projects with my new holiday catalog preorder items. I wanted to share an adorable and easy peasy Halloween project today. Halloween is two months from today! Eek! I better get cracking on some more Halloween projects.

As soon as I saw the Cookie Cutter bundle (Christmas stamp and coordinating punch) it went to the top of my wish list. Imagine my surprise when I looked further in the catalog and there was a Halloween Cookie Cutter stamp too! The little guys are just too cute. There is a skeleton, scarecrow, vampire, and mummy plus some coordinating items in the stamp set. Oh my! One quick reminder you can start ordering from the catalog tomorrow September 1st.

I decided to create this skeleton tag since I saw it shared by another demonstrator on a Facebook group. She shared it as an option to make for kids, but I love it for myself. I couldn't resist making a tag to hand from my tote bag which I use as my purse daily. This project is easy peasy and can involve the kiddos.

Here are the steps:
1. Stamp two skeletons in Memento black ink on Whisper White cardstock (see tip below)
2. Punch images out with Cookie Cutter Builder Punch
3. Glue images back to back with Multipurpose Liquid Glue
4. Adhere punched image to two pieces of clear packing tape
5. Trim around edges of image with Paper Snips to remove excess packing tape (adults should handle the snips - these small scissors are sharp!)
6. Punch hole at top of skeleton with hole punch (I used my retired cropadile)
7. Thread through book ring (what I had on hand) or ball chain
8. Add to bag, purse, backpack

Christine's Tip: To save on cardstock when I am punching my images I pre-cut my cardstock in 1.5 inch strips perfect for stamping and it is less mess and wasted cardstock.

I linked the products I used on the card below. Let me know if you have any questions.

Happy Stampin',
Christine
Supplies:
Stamps: Cookie Cutter Halloween (available 9/1)
Other: Cookie Cutter Builder Punch (available 9/1), Paper Snips, Multipurpose Liquid Glue, Clear Packing tape, Book ring