 |
| Petite Cafe Gift Bag Stampin' Up! |
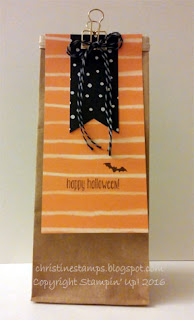
Last night our internet was down (good old Comcast) so I couldn't post my 3rd project in my 12 days of Halloween series so here it is for you! This is a quick & simple petite cafe gift bag inspired by page 50 of the Stampin' Up! holiday catalog.
Sorry the photo isn't the greatest it was raining cats & dogs here yesterday. We need the rainfall since we have been under a major drought over the last several months although I do wish mother nature saved the rainfall for a work day. We spent the afternoon in Boston walking around huddled under a large golf umbrella, but we made the best of it.
How-to make the petite cafe gift bag:
1. Cut a piece of Designer Series Paper 3" x 6" (orange striped)
2. Cut another piece of Designer Series Paper 1.5" x 3" (silver polka dot) and punch bottom with the Banner Triple Punch
3. Stamp the Happy Halloween image from Spooky Fun
4. Stamp the bat image from Spooky Fun above Happy Halloween
5. Adhere the polka dot banner to the orange striped piece with fast fuse adhesive
6. Add the paper banners to the gift bag with a gold binder clip
7. Make a double bow out of twine and attach to the gold binder clip with a mini glue dot
Did you know the bags are food safe? They are a nice size at 3.5" x 2.5" x 8" and would fit cookies, popcorn, or a nice amount of candy for any ghosts & goblins for Halloween! I am going to bring a few to my event this Friday night to dress up my table.
I linked the products I used below. Let me know if you have any questions.
Happy Stampin',
Christine
Supplies:
Stamps:
Spooky Fun
Ink:
Tuxedo Black Memento
Paper:
Halloween Night Specialty Designer Series Paper
Other:
Banner Triple Punch,
Halloween Night Baker's Twine,
Petite Cafe Gift Bags,
Gold Binder Clip,
Mini Glue Dots,
Fast Fuse Adhesive


