 |
| Tin of Tags Stampin' Up! Quick post for tonight. I made 10 of these cards over the past few days (5 of each) to have for some Christmas card class samples. It has been a busy weekend celebrating my hubby's birthday. He had to work for a few hours in the morning, afternoon and late evening on his birthday, but we were able to spend a few hours in the late afternoon at the Beantown Jazz Festival in Boston. After his band show Saturday we drove to Cape Cod so we could attend the Scallop Festival yesterday and hear our friend's band play. I took today off my day job so we could stay on Cape Cod and come home this afternoon. As of yesterday there are less than 3 months until Christmas! I am holding Christmas Card classes in October and November so if you are reading this post and live local please let me know. Card classes are $15 for 4 cards or free with a qualifying order. I am also offering the Tin of Tags class for $30 where you can make 30 Christmas cards. The two cards above feature the Tin of Tags stamp set that coordinates with the tin of tags project kit. It is a super cute stamp set for cards! I would love to know if you have started working on your Christmas cards yet? Let me know if you would like to host a fun night of stamping with friends. I have linked the products I used on my cards below. Happy Stampin', Christine Supplies: Stamps: Tin of Tags Ink: Real Red & Dapper Denim Paper: Whisper White Cardstock, Real Red Cardstock, Dapper Denim Cardstock, Silver Glimmer Paper Other: Big Shot, Softly Falling Textured Impressions Embossing Folder, 1 3/4" Circle Punch, Decorative Label Punch, Stamping Sponge, Silver 1/8" ribbon, Real Red 3/4" Stitched Edge Ribbon, Rhinestone Basic Jewels, Mini Glue Dots, Stampin' Dimensionals, Fast Fuse Adhesive, Multipurpose Liquid Glue |

Showing posts with label Big Shot. Show all posts
Showing posts with label Big Shot. Show all posts
Monday, September 26, 2016
Simple Christmas Cards with Tin of Tags
Tuesday, September 20, 2016
Jar of Cheer Card
 |
| Jar of Cheer Stampin' Up! Quick post for tonight. I made this card earlier tonight when I got home from work. It was made for a fall color challenge. I am loving challenges lately to get the creativity flowing. Three of the colors in the challenge were Real Red, Crushed Curry, and Pear Pizzazz. I immediately thought of the candle stamp in the Jar of Cheer stamp set in the holiday catalog. The stamps are colored with a blender pen. On the tree I blended darker at the top and lighter on the bottom. Christine's Tip: I die cut jars out of window sheets to go over my stamped jars. I adhered two glue dots at the top of the jar window sheets and hid the adhesive with the lids of the jars. I linked the products I used to make this card below. This card would be easy to mass produce for holiday cards. Don't forget tomorrow is the last day to save on the Special Offers sale in my Online Store. Let me know if you have any questions. Happy Stampin', Christine Supplies: Stamps: Jar of Cheer Ink: Basic Gray Archival, Real Red, Crushed Curry, Pear Pizzazz Paper: Whisper White cardstock & Red Glimmer Paper Other: Big Shot, Everyday Jar Framelits Dies, Softly Falling Textured Impressions Embossing Folder, Window Sheets, Blender Pen, Mini Glue Dots, Stampin' Dimensionals |
Sunday, September 11, 2016
Happy Grandparents Day! Jar of Love card
 |
| Jar of Love Stampin' Up! |
I chose to pull out my Jar of Love stamp set to make a vase of flowers card to bring her today. She loves flowers and usually has quite a few plants/fresh flowers in her apartment at all times. The inspiration in the colors of this card came from a funny item. Hubby & I were getting ice cream at a local place a few weeks ago and I snapped a photo of the cup from his frappe - the colors were green, purple, and yellow. I immediately thought of purple & yellow flowers with green stems! Do you take photos on your phone of items for inspiration too?
Christine's tip: The flower images are two stepped stamped. I found it easiest to stamp the darker/middle section first in full strength and then I stamped off with the larger flower image to get the softer color. This is of course easy to do since the stamp set comes in Photopolymer so you can see through it.
Let me know if you have any questions. I am loving all the stamp sets in the holiday catalog that coordinate with the Everyday Jars Framelits Dies. You can purchase the items I used on this card in my Online Store. I have linked the products below. Don't forget if you purchase the Jar of Love stamp set & Everyday Jars Framelits Dies as a bundle you save 10%.
Don't forget about the current Stampin' Up! promotions:
Special Offers through 9/21 - save 25% on items in my Online Store:

Paper Pumpkin monthly subscription BOGO sale through 10/10:

Supplies:
Stamps: Jar of Love
Ink: Sweet Sugarplum, Crushed Curry, Old Olive, Smoky Slate
Paper: Sweet Sugarplum cardstock & Whisper White cardstock
Other: Big Shot, Everyday Jar Framelits Dies, Whisper White Baker's Twine, Stampin Dimensionals, Fast Fuse Adhesive, Multipurpose Liquid Glue
Happy Stampin',
Christine
Sunday, September 4, 2016
My Favorite Item for Halloween is...
 |
| Cookie Cutter Halloween Stampin' Up! |
Cookie Cutter Halloween! I am in love with these little guys. We are busy trying to soak in the sunshine of summer before Hurricane/Tropical Storm Hermine makes her way up into New England tonight/tomorrow. If it starting to feel a little cooler here. Yesterday we were up in Gloucester in the afternoon and I had my hoodie on most of the time.
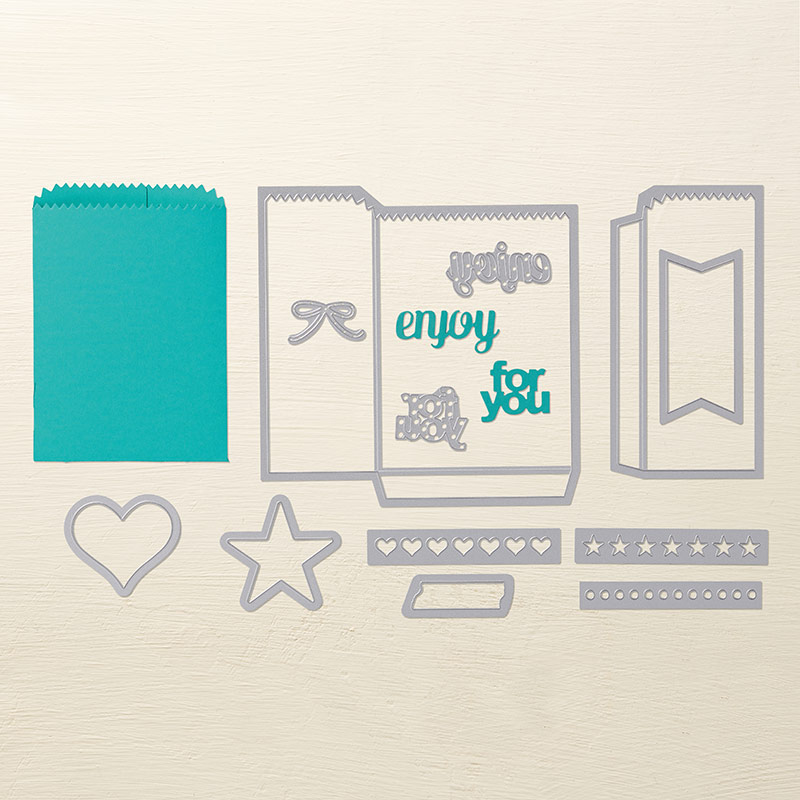
I made this goodie bag out of the Kraft tag a bag gift bags. The ribbon is not glued to the bag so it can slide right off to get to the goodies inside. This would be super easy to make a bunch for trick-or-treaters or co-workers for Halloween. I did base my design on the one Stampin' Up! shared in the holiday catalog. Here is the image:
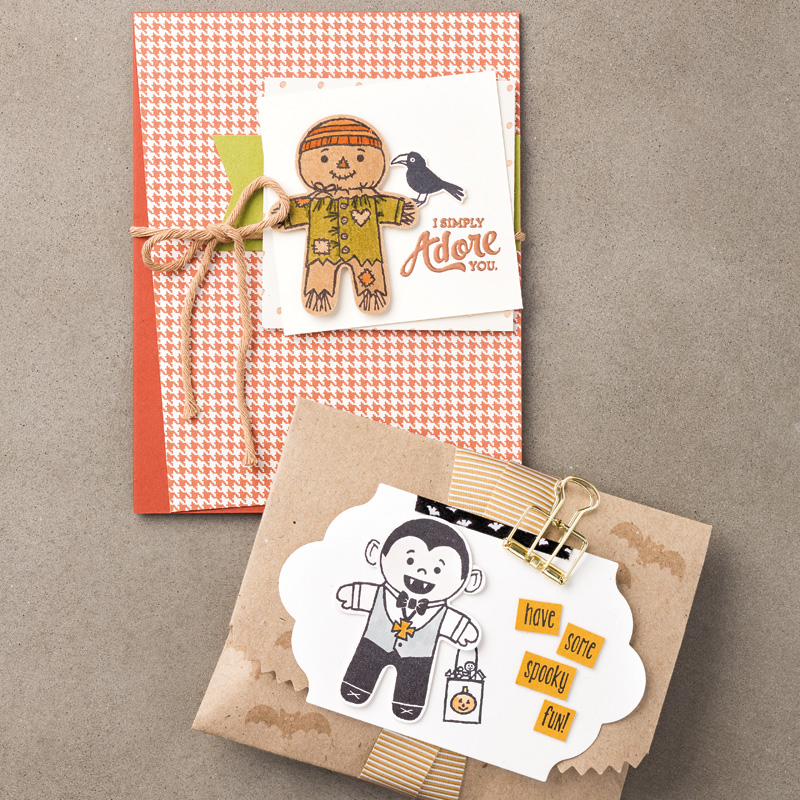
Christine's Tip: I used the banner from the Mini Treat Bag Thinlit Dies, but I kept the top part of my cardstock above the edge so it cut the image straight across on the top. I hope that makes sense let me know if you have any questions. Here is a visual shot of the dies in the set.
I linked the products I used below.
If you are local to Lowell, MA let me know if you would want to have a class to make these treats?
Happy Stampin',
Christine
Supplies:
Stamps: Cookie Cutter Halloween, Teeny Tiny Wishes
Wednesday, August 24, 2016
Baby Boy Congrats Card

My co-worker Connie just became a first-time grandma and this is the card I made from our admin team to congratulate her. I shared another girl version of the card on my blog on 8/17 here. I used the same overall design of the other card, but I changed the pops of color from Flirty Flamingo to Pool Party. I also changed the flower framelit to the tie. Have you checked out the Baby's First Framelits Dies? You get 11 framelits in the set.
Christine's Tip: Upon first glance of the A Little Foxy Designer Series Paper stack there are diagonally striped papers, but if you have a die you can cut on an angle on the Big Shot you come up with a cute striped onesie. I love when those aha moments happen.
I am looking forward to making some more baby cards to have in my stash. There are lots of possibilities with the A Little Foxy Suite or even just using the Designer Series papers from the stack with framelits like I have created here.
I hope this card inspires you to make a baby card to add to your stash.
I have linked the products I used on the card below.
Happy Stampin',
Christine
Supplies:
Stamps: Balloon Celebration
Ink: Pool Party
Other: Big Shot, Baby's First Framelits Dies, Snail Adhesive, Multipurpose Liquid Glue, Mini Glue Dots, Whisper White Baker's Twine
Monday, August 22, 2016
Sneak Peek! Cookie Cutter Christmas meets Balloon Celebration

Today I am sharing a sneak peek from the Holiday catalog which starts September 1st. What is a girl to do when she has new holiday product and is participating in a birthday themed swap? Create a mash-up card! I combined a brand spanking new holiday stamp set Cookie Cutter Christmas with a great birthday stamp set Balloon Celebration.
I made this card for our team meeting swap yesterday. I think it would be cute to send to a little boy for his birthday. I am in love with the teddy bear.
Christine's Tips: I love trying to show versatility in my stamp collection. The adorable teddy bear image in Cookie Cutter Christmas certainly isn't just for the holidays. Adding a punched balloon makes it cute for a birthday and it would be cute for a new baby card too by just changing the card a bit. To get the burlap threads I cut a piece of the 5/8" burlap ribbon and pulled down the middle and then pulled out the threads from the middle.
I can't wait to share more with you from the holiday catalog. I have added links below to the products I used from my online store.
Let me know if you have any questions.
Happy Stampin',
Christine
Supplies:
Stamps: Balloon Celebration, Cookie Cutter Christmas (available 9/1/16)
Ink: Pool Party, Crumb Cake, Early Espresso
Paper: Whisper White cardstock & Pool Party cardstock
Other: Big Shot, Project Life Cards & Labels Framelits Dies, Softly Falling Textured Impressions Embossing Folder, 5/8" Burlap ribbon, Balloon Bouquet punch, Mini Glue Dots, Stampin Dimensionals, Fast Fuse Adhesive, Multipurpose Liquid Glue
Wednesday, August 17, 2016
Baby Girl Congrats Card

So I have a funny story of how this cute baby girl congratulations card came about. My co-worker Connie told me months ago she was going to be a first-time grandma as her daughter was pregnant. I have been anticipating the day and knew I needed to make her a card. Well, the other day she came in and told me the latest scoop. Her daughter is young and has had a very healthy pregnancy so she had her second ultrasound at 9 months pregnant to find out she was having a boy instead of a girl! Ack! So hence I need to make a boy version of this card which I will share with you next week. They are super excited and were able to return some of the girly items they previously purchased.
So for the details of the card. First of all I love the colors with the soft Smoky Slate and the pretty pops of Flirty Flamingo. The card came together very quickly as I knew I wanted to use the super cute A Little Foxy Designer Series Paper Stack and the Baby's First Framelits Dies (onesie and flower). I added a sentiment and a few embellishments and voila it was done in minutes. The baker's twine which I put across the top of the onesie to mimic a clothesline is from the July 2016 Paper Pumpkin kit. The enamel dot is from 2016-2018 in color enamel shapes.
Christine's Tip: The Magnetic Platform for the Big Shot die cutting machine is essential when using framelits. I was able to line up my heart designer series paper and crop it out perfectly with the onesie framelit.
You can find all the products I used to make this card in my Online Store.
I hope this card inspires you to make something crafty. You could certainly change the onesie to another shape to create a different card in a snap.
Happy Stampin',
Christine
Supplies:
Stamps: Balloon Celebration
Ink: Flirty Flamingo
Paper: A Little Foxy Designer Series Paper Stack, Smoky Slate & Flirty Flamingo cardstock
Other: Big Shot, Baby's First Framelits Dies, 2016-2018 In Color Enamel Shapes, Flirty Flamingo twine from July 2016 Paper Pumpkin kit, Stampin dimensionals, Mini glue dots, Snail adhesive, Multipurpose liquid glue
Tuesday, June 7, 2016
Happy Graduation!

Happy Tuesday evening! I am back to share a quick & easy graduation card. It is the time of year around here for high school graduation ceremonies and lots of graduation parties happening this month. I made this card in my high school colors of blue and white. Of course for the blue I chose the new 2016-2018 in-color Dapper Denim.
The card features the Large Numbers Framelits Dies for the numbers and banners, the new stamp set Thoughtful Banners, and the Mini Treat Bag Thinlits Dies for the stars.
I'll be back on Thursday to share another card I made this week.
Have you checked out the new catalog yet? You can visit my Online Store to see all the products available.
Let me know if you have any questions.
Happy Stampin',
Christine
Stamps: Thoughtful Banners
Ink: Dapper Denim
Paper: Whisper White & Dapper Denim cardstock, Silver Glimmer
Other: Big Shot, Large Numbers Framelits Dies, Mini Treat Bag Thinlits Dies, Mini glue dots, Multipurpose liquid glue
Saturday, July 23, 2011
Fun Flowers Bookmark

This was my swap for Tuesday's team meeting. I made everyone attending a Fun Flowers bookmark in the new Stampin' Up! color Calypso Coral to match the cover of their catalog. I am in love with this color it so fun and summery.
A few months ago when the Fun Flowers die first came out I was seeing these bookmarks all over the place so I thought it was time to make some. A half of sheet of 8.5" x 11" cardstock is perfect for this project as it covers the Fun Flowers die completely. Run this through your Big Shot and it cuts out three nesting flowers, a small circle and a tiny flower shape. I used all these pieces plus a few additional punches.

Then comes the fun part I ran each flower through the Crimper about 20 times as this breaks down the fibers in the cardstock and then I crumpled each one up in a ball then flattened out again. I then sponged the same color ink around the edges and got to work adhering. Stampin' Dimensionals are perfect for this project. I punched two additional circles 1 1/4" and 1 3/4" out of the scrap. When layering together use the tiny circle from the die for the back of the smallest flower and the larger circles for the other flowers. The circles in between the flowers gives stability and a great 3D look to the bookmark.
I stamped my sentiment handcrafted from the Tiny Tags stamp set. I then punched that out with the coordinating jewelry tag punch. You can adhere that with glue dots then finished off the front with a large pearl rhinestone. For ribbon I used Very Vanilla seam binding and that piece measures 15" long.
All the supplies for this card can be purchased in my Online Store.
Supplies:
Stamps: Tiny Tags
Ink: Calypso Coral
Paper: Calypso Coral & Very Vanilla cardstock
Other: Big Shot, Fun Flowers die, Very Vanilla seam binding ribbon, Basic Pearls Jewel accents, Jewelry tag punch, 1 1/4 circle punch, 1 3/4 circle punch
Happy Stampin,
Christine
Tuesday, March 15, 2011
Spring Easter Card Swap

Here is my card swap from last Friday night's team meeting at Selene's. The swap theme was Spring so I definitely think the color combination of Daffodil Delight, Pretty in Pink and Marina Mist fits that nicely. I received a box of goodies from Stampin' Up! last week so I was determined to use my new Fun Flowers Big Shot die from the Occasions Mini catalog.
I used a technique called Inlaid embossing on this card. You can say this card is probably Big Shot over the top! I used the Top Note Die to cut the Daffodil and white layers then I cut out the edge on the white layer and matted to the Daffodil. Then I cut the flowers from the Fun Flowers die in Daffodil & Pretty in Pink. Then I glued the flowers to the white layer and ran all four layers through the Big Shot in my Square Lattice embossing folder. It adds a nice quilted look on my card. I was able to bend up the edges on the pink flower for some dimension then I added the Daffodil button.
Supplies:
Stamps: Teeny Tiny Wishes
Ink: Marina Mist
Paper: Marina Mist, Daffodil Delight, Pretty in Pink, Whisper White
Other: Big Shot, Top Note Die, Fun Flowers Die, Square lattice embossing folder, Brights button in Daffodil, linen thread, Scallop oval punch, Oval punch
Wednesday, February 23, 2011
Big Shot Die Tip

Adding the sticker paper fixes this problem. I ended up buying sticker paper at a local craft store since I had a gift card and coupon. I am pretty sure you can also find some at an office supply store. I think this is a super helpful tip.
Pictured here is my Top Note Die from Stampin' Up for the Big Shot.
You can now find me on Facebook! Just search for Christine Miscia Stampin' Up! Demonstrator and 'Like' my page.
Monday, December 20, 2010
12 Days of Christmas Ideas # 9
 A great gift idea is a set of all occasion cards. I made up 3 of these sets for my aunt Linda to give to her girlfriends for Christmas.
It went pretty quick once I decided on the colors (all from our Regals collection) and keeping it simple with just some embossing, ribbon and sentiment.
I am really happy with how they turned out and look forward to hearing how the ladies like them as well.
For the box I always follow the A2 card box tutorial at Splitcoaststampers. The box can easily hold 12 cards and envelopes. For this project I went with 2 of each design so there were 10 cards total in the box.
 Supplies:
Stamps: Sincere Salutations, Elements of Style
Ink: Garden Green, Cherry Cobbler, Cajun Craze, Not Quite Navy, Elegant Eggplant
Paper: Very Vanilla, Garden Green, Cherry Cobbler, Cajun Craze, Not Quite Navy, Elegant Eggplant cardstocks
Other: Big Shot, Vintage Wallpaper embossing folder, Square lattice embossing folder, Elegant Bouquet embossing folder, Manhattan Flower embossing folder, Petals-a-Plenty embossing folder, Very Vanilla satin ribbon, Decorative label punch, Oval punch, Scallop oval punch, linen thread
Subscribe to:
Posts (Atom)